
Most tutorials for spec-driven development (SDD) assume you are starting with a blank canvas. In practice, at least for professional developers, you are rarely starting a greenfield project — you have an existing code base, possibly developed over years, and now you want to use agentic engineering to accelerate your development.
A spec-driven approach is still a good option, because even if you don't have a formalised spec for the rest of your product, you do want one for new features. This article walks through applying SDD to an existing project, using OpenSpec as the framework.
OpenSpec is light-weight, and uses spec changes (deltas) that are merged into a central spec repository. Because of this delta-based approach, you can drive a change to an existing system even if no central spec repository exists yet — making it a good fit for existing code bases.
OpenSpec
OpenSpec combines standardised prompts with a deterministic CLI tool (openspec) to guide agents through a structured workflow.
Schema
The core of OpenSpec is a schema — a set of documents with defined dependencies between them. The documents are the key outputs; the prompts and CLI are tools to help produce them.
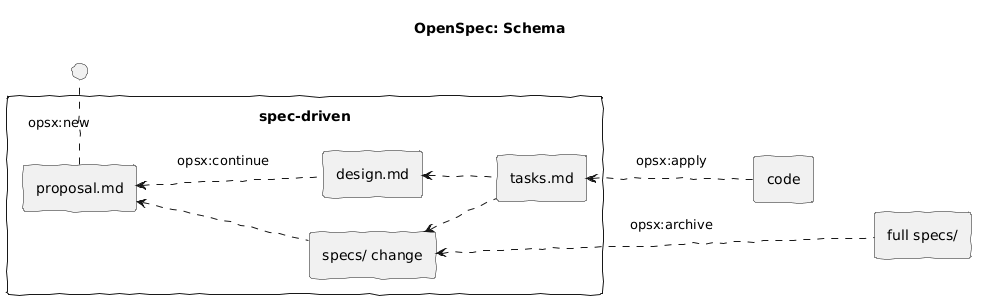
The default schema is spec-driven, but you can create custom schemas in your project if you need. Each document in the schema has specific instructions, dependencies, and a template.
You should not feel constrained by the tooling — feel free to update documents via direct agent prompts or even manually.
Commands, skills, and workflows
Commands and skills are standardised prompts to generate schema outputs. They need to be installed in the tool you are using (e.g. Copilot, OpenCode, Gemini, Codex, Claude, etc). You can install either or both, and they can be used interchangeably.
Note the default install only configures four core commands, but I generally prefer the opsx:new and opsx:continue commands, so make sure to install those via configuration.
A workflow combines commands to work through producing the outputs of a schema. The instructions from the command are combined with the document instructions from the schema and any project context, then passed to the AI agent. The instructions include calls to the OpenSpec CLI for deterministic behaviour, e.g. openspec list to get a list of active changes.
Case study
Background
The case study walks through a change to a WordPress plugin, Gryphon Verified Client IP.
The plugin was written relatively recently, initially with a spec-driven approach, but using a manually created file, iterated on with a combination of agent prompts and manual changes, and then implemented through standard agent prompts. It did not use a spec-driven framework.
Although written relatively recently, the project is an example of pre-existing code that I want to apply OpenSpec to for the first time.
Setup
I am using VS Code as my IDE, and GitHub Copilot for this example, however a similar process can be followed in any supported IDE or tool.
First install OpenSpec. The WordPress plugin project is written in PHP and uses a development container, so for me this consists of adding the Node feature to the container, and then installing OpenSpec, in devcontainer.json:
  ...
  "features": {
    "ghcr.io/devcontainers/features/node:1": {}
  },
  "postCreateCommand": "... && npm install -g @fission-ai/openspec@latest"
  ...
After that I can check in the VSCode Terminal the version installed, and then initialise openspec for the project.
I prefer opsx:new and opsx:continue commands, so also use the interactive profile configuration to install them:
openspec --version
openspec init --tools github-copilot
openspec config profile
In VS Code, create a new branch for your change, e.g. feature/add-settings-link, and check it out. OpenSpec doesn't mandate a particular branching strategy out of the box, so you need to do it yourself.
Step 1: Create proposal.md
In GitHub Copilot start a new session and instruct the agent to create a new OpenSpec change:
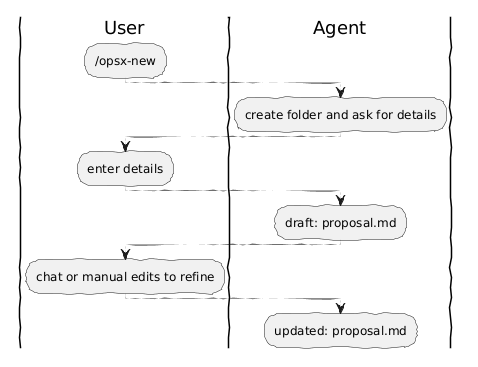
/opsx-new add-settings-link
The agent will then create a folder for the change, openspec/changes/add-settings-link, and ask for the details of the change you want to make.
As the change I wanted was already logged as a GitHub issue, I just referred the agent to the issue (needs the relevant tool), but you could also just describe the change directly.
Create a proposal for issue #9 from GitHub
The agent then creates a draft proposal.md.
## Why

The WordPress Plugins page lists all installed plugins but provides no quick link to Gryphon Verified Client IP's settings or user guide. Administrators must navigate through the Settings menu to ...
You should review the draft and request any changes you need made, or edit the file directly. In my case I manually added an example image from the GitHub issue.
Step 2: Create design.md

Once you are happy with the proposal, instruct the agent to continue drafting the design.
/opsx-continue
The command will use the OpenSpec CLI to determine the state of the change, and the next required output from the schema. If necessary it will ask you any questions it needs and then create a draft design.md
...

## Goals / Non-Goals

**Goals:**

- Add "Settings" and "Guide" links to the plugin's row on the Plugins page.
- Keep the implementation minimal — a single filter registration and callback.
- Follow existing patterns: place the logic in `AdminPage` alongside other admin registrations.

**Non-Goals:**
...
Step 3: Create spec changes
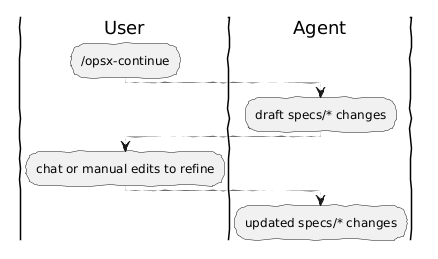
At this point, the design becomes concrete — translating the proposal into formal, testable requirements. Continue again with the same command:
/opsx-continue
The deterministic CLI tracks which documents are completed, which are available to be created (unlocked), and which are blocked waiting dependencies — so the same command always progresses to the correct next output.
Specs are organised into separate files based on the structure of the application, i.e. there can be multiple spec files.
A change contains changes to the spec, such as added, updated, or removed requirements (the delta). The delta-based approach allows the tool to be easily used on existing code.
## ADDED Requirements

### Requirement: Settings link on Plugins page

The plugin SHALL add a "Settings" action link to its row on the WordPress Plugins page. The link SHALL navigate to the plugin's settings page.

#### Scenario: Settings link is present

- **WHEN** an administrator views the WordPress Plugins page
- **THEN** the plugin's row SHALL display a "Settings" action link before the default action links
I made a few small changes to the spec, before moving on. I removed a few technical implementation details that shouldn't be there, e.g. the URL of the settings and guide pages, or the particular way the links were added to WordPress (as filters).
Step 4: Create tasks.md
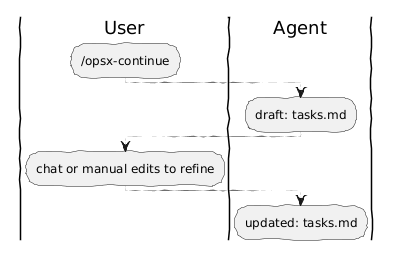
With the spec pinned down, the next step breaks the work into an actionable plan. Continue once more:
/opsx-continue
The generated tasks.md can be reviewed and edited like any other document. The list was fairly short for this change, covering steps such as adding tests and checking validation, but I added some steps to commit code as it went.
## 1. Implementation

- [ ] 1.1 Add `add_action_links` callback method to `AdminPage` that prepends "Settings" and "Guide" links to the action links array
- [ ] 1.2 Register the `plugin_action_links_{basename}` filter in `AdminPage::register()` using `VCIP_PLUGIN_FILE`
- [ ] 1.3 Check in the code changes, as a separate commit from writing tests

## 2. Testing

- [ ] 2.1 Add integration test verifying the filter callback returns "Settings" and "Guide" links prepended before existing links
      ...
Step 5: Let the agent write the code
With proposal, design, specs, and tasks all in place, the schema unlocks the apply (and archive) operations — the agent now has everything it needs to implement the feature.
To start the agent implementation, tell it to apply the change.
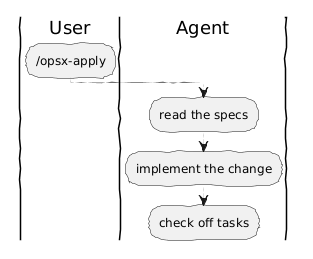
/opsx-apply
This command iterates through each of the tasks in the plan and implements the feature as specified. The tasks.md document is updated as each task is completed.
## 1. Implementation

- [x] 1.1 Add `add_action_links` callback method to `AdminPage` that prepends "Settings" and "Guide" links to the action links array
- [x] 1.2 Register the `plugin_action_links_{basename}` filter in `AdminPage::register()` using `VCIP_PLUGIN_FILE`
- [x] 1.3 Check in the code changes, as a separate commit from writing tests

## 2. Testing

- [x] 2.1 Add integration test verifying the filter callback returns "Settings" and "Guide" links prepended before existing links
      ...
Step 6: Archive and merge the spec
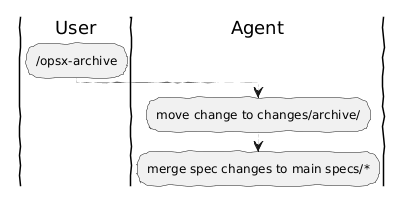
When the feature is complete, tell the agent to archive the change. The archive command will move the change files to the changes/archive/ folder, and merge the spec changes in to the main specs/ folder.
/opsx-archive
As this is the first change, there is nothing to merge into and the delta specs will simply be synced and copied into the full specs.
Observations
Human in the loop
The new/continue workflow gives additional human gateway steps, as the spec progresses from proposal.md → design.md → specs/ changes → tasks.md, although the default propose workflow still has a hard gateway between spec and implementation.
You should also at least smoke test the feature after completion, to make sure it works as expected.
Deterministic tools
Using a deterministic tool helps keep the agent on track, with a context aligned to the change that needs to be made. The openspec CLI tracks the current state of the change, what is specified in the schema, the instructions to use, and which documents to include.
The integration with a wide variety of tools (as skills and commands) allows the framework to be used cross-platform. The flexible workflow of the system, focussing on actions (not states) facilitates various approaches, including good support for existing applications (not just new ones).
Context management
Using spec-driven development helps reduce specification drift. However the default process includes the instruction "Keep going through tasks until done or blocked", so the agent will try to implement the whole feature (complete all tasks) in one go.
For a very large feature this could lead to context degradation, so keep changes small or look at an alternative implementation loop, such as stopping after each section and restarting in a new context. Because progress is tracked through the tasks.md file, another agent can pick up where the first one finished.
Spec maintenance
Because the merged full spec was just a copy of the spec change, it was a bit messy, e.g. still had the ## ADDED Requirements header, which doesn't make sense.
Even when merging, you can still end up with poorly organised specs, duplicates, or contradictory specs. Spec clean up tools are not yet part of OpenSpec, but have been a requested feature.
Cost economics
Token cost is a first-class concern for agentic development — you should always monitor and compare the cost of different approaches. Using a spec-driven development approach can require additional calls to create the spec and task lists, but overall should make implementation easier and more focussed, potentially reducing overall token cost.
You do need to be careful of the size of changes however, as in this case, it was 13 lines of code, with about 70 lines of test code, and 130 lines of spec-driven documents, i.e. it might have been easier as a straight agent prompt.
Quality assurance approach
Automated testing (as opposed to testing new features) helps ensure that future changes don't break past functionality, so is important as a system grows.
I believe behaviour-driven development (BDD) feature tests are more important than unit tests for agent-based development. If you aren't writing the code, then unit tests aren't going to be that meaningful — an agent can generate both code and tests with the same misunderstanding.
A higher level approach, using BDD with tests specified in the Gherkin domain-specific language, validates behaviour rather than implementation. The given-when-then structure of OpenSpec scenarios appears to be a good fit for BDD.
Next steps
Agentic engineering is maturing fast, so if you want to keep up grab your existing code base and start experimenting with a spec-driven development tool such as OpenSpec, Spec Kit, Agent-OS, or similar.
We don't really know what all the good practices are yet, as this is an emerging field. Is spec-driven development the way to go, or is it just a poor duplicate of the actual code? Should we instead treat code-as-spec (i.e. throw away specs used for development)?
OpenSpec still needs some development around the opsx:apply step to handle keeping a clean context, and maintaining the merged spec (or updating the spec from code). Tools to validate confidence in the result are also needed. While the spec might be readable and understandable, that is no guarantee the code does what the spec says.
We may still need some independent validation. The given-when-then structure used in OpenSpec, at a business level, could lead to a good integration with techniques such as behaviour-driven development.
Install OpenSpec today and start trying it out!