
The iZone Climate Control system is an effective way to manage ducted air conditioning in your home allowing multiple zones with separate target temperatures and controlling the central unit and airflow to each area.
Through the bridge component you can integrate it locally with Home Assistant, as well as other smart home platforms (Google etc, Apple Home, etc). The iZone platform supports other components (lights, irrigation, etc), however I am focussing on the climate control.
You need some additional manual configuration to bring in all the system details, including the current control zone, target temperature, supply temperature, and operating modes.
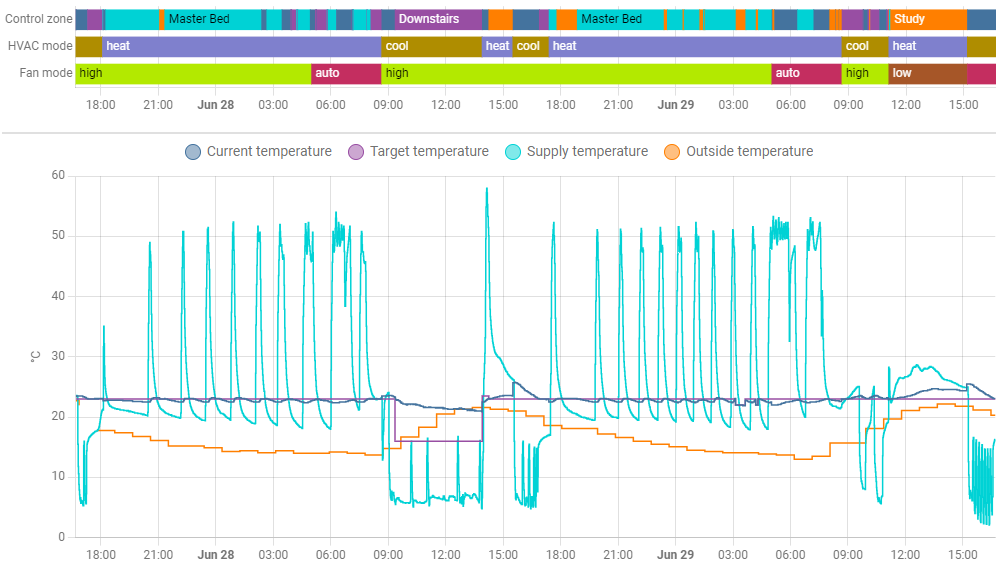
Once configured you can set up a dashboard to track the climate in your house throughout the day:
iZone integration
The iZone integration can be auto-discovered by Home Assistant, or you can add manually if needed. Many different ducted air conditioning brands are supported (I have a Fujitsu ARTC72LATU 20kW with the iZone C325F2 controller).
Note that the current Home Assistant integration only supports the climate control features of iZone and there is no support yet for lights, irrigation, or other features.
The default History Graph for the iZone Climate is very limited, only showing the current temperature (coloured for heating or cooling), however additional attributes are available to use with some custom configuration.
These additional attributes, such as the current control zone target temperature, are available directly on the entity, and you can expose them using template sensors. Go to Developer Tools > States, then Filter entites for 'izone', and you can there is a number of other attributes.
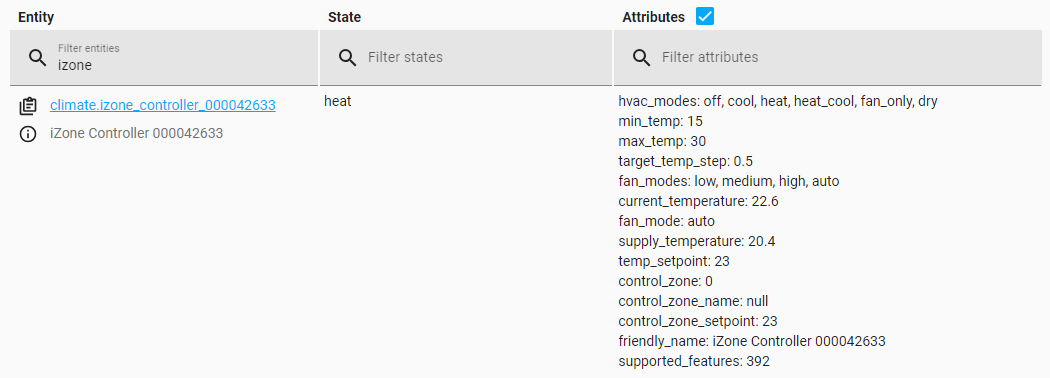
Standard Climate entity attributes:
- entity state (hvac_mode)
- current_temperature
- fan_mode
Custom attributes:
- control_zone
- control_zone_name (empty on my installation)
- control_zone_setpoint
- supply_temperature
- temp_setpoint (same as control_zone_setpoint)
Configure Template sensors for additional attributes
To expose the entity states we can configure template Sensor entities. See https://www.home-assistant.io/integrations/template/
For a HAOS installation you need to configure a File Editor add-on; for other installations you can edit files directly. You need to configure a template: section in configuration.yaml.
We configure six of the values: control_zone (converted to a name, adjust to your installation), hvac_mode, fan_mode, current_temperature, control_zone_setpoint (the target temperature), and supply_temperature.
We also add the current outside temperature from the weather forecast, for comparison.
template:
  - sensor:
      # iZone custom sensors
      - unique_id: izone_control_zone
        name: izone_control_zone # "Control zone"
        state: >
          {{ ['Master Bed','Upstairs','Study','Downstairs'][state_attr("climate.izone_controller_000042633","control_zone")] }}
      - unique_id: izone_hvac_mode
        name: izone_hvac_mode # "HVAC mode"
        icon: mdi:hvac
        state: >
          {{ states('climate.izone_controller_000042633') }}
      - unique_id: izone_fan_mode
        name: izone_fan_mode # "Fan mode"
        icon: mdi:fan
        state: >
          {{ state_attr("climate.izone_controller_000042633","fan_mode") }}
      - unique_id: izone_current_temperature
        name: izone_current_temperature # "Current temperature"
        unit_of_measurement: °C
        state: >
          {{ state_attr("climate.izone_controller_000042633","current_temperature") }}
        device_class: Temperature
      - unique_id: izone_target_temperature
        name: izone_target_temperature # "Target temperature"
        unit_of_measurement: °C
        state: >
          {{ state_attr("climate.izone_controller_000042633","control_zone_setpoint") }}
        device_class: Temperature
      - unique_id: izone_supply_temperature
        name: izone_supply_temperature # "Supply temperature"
        unit_of_measurement: °C
        state: >
          {{ state_attr("climate.izone_controller_000042633","supply_temperature") }}
        device_class: Temperature
      # Weather
      - unique_id: weather_temperature
        name: weather_temperature # "Outside temperature"
        unit_of_measurement: °C
        state: >
          {{ state_attr("weather.forecast_home","temperature") }}
        device_class: Temperature
After updating configuration.yaml, go to Developer tools > YAML and click 'Check Configuration', and if everything is good you can restart / reload.
YAML entries need to have a unique_id to override them from the UI. Next to the sensor name I have added the display name that I set by going to Settings > Devices & Services > Entities, and then filter on 'izone' to find the Template sensor entities.
Creating helpers from the UI
You can also create the template sensors manually from the UI via Settings > Devices & Services > Helpers, select Create Helper, then Template > Template a sensor.
Create the following state templates, adjusting the zone names for your installation:
| Name | State template |
|---|---|
| iZone Control zone | {{ ['Master Bed','Upstairs','Study','Downstairs'][state_attr("climate.izone_controller_000042633","control_zone")] }} |
| iZone HVAC mode | {{ states('climate.izone_controller_000042633') }} |
| iZone Fan mode | {{ state_attr("climate.izone_controller_000042633","fan_mode") }} |
And the following temperature templates:
| Name | State template | Units | Device Class |
|---|---|---|---|
| iZone Current temperature | {{ state_attr("climate.izone_controller_000042633","current_temperature") }} |
°C | Temperature |
| iZone Target temperature | {{ state_attr("climate.izone_controller_000042633","control_zone_setpoint") }} |
°C | Temperature |
| iZone Supply temperature | {{ state_attr("climate.izone_controller_000042633","supply_temperature") }} |
°C | Temperature |
Dashboard configuration
Once the template entities are added, a History Graph card can be used to display them:
type: history-graph
entities:
  - entity: sensor.izone_control_zone
  - entity: sensor.izone_hvac_mode
  - entity: sensor.izone_fan_mode
  - entity: sensor.izone_current_temperature
  - entity: sensor.izone_target_temperature
  - entity: sensor.izone_supply_temperature
  - entity: sensor.weather_temperature
This main history card is in the top left, and you can see the detail it provides along with the rest of the dashboard.

I use a Sections layout with the main History Graph first and then Thermostat controls for each of the zones in horizontal stacks, plus the overall controller Thermostat, which has different controls and no set point. I also added the Weather Forecast card.
Being able to see the overall relationship between the current control zone temperature, current target temperature, supply temperature, and outside (weather) temperature, is very useful.
The second section, which displays on the right on the desktop (and below the others on mobile) has a History Graph for each zone, with the default entity being sufficient to show the current temperature and target temperature.
Limited default graph
The default History Graph for the iZone Climate entity is similar to the zone history graphs on my dashboard, but only shows current temperature, along with area graphs for the state of heating or cooling.
A target temperature value is listed, however it is empty. The default target temperature is settable, which the central system is not (it is set per zone), so it is not actually used.
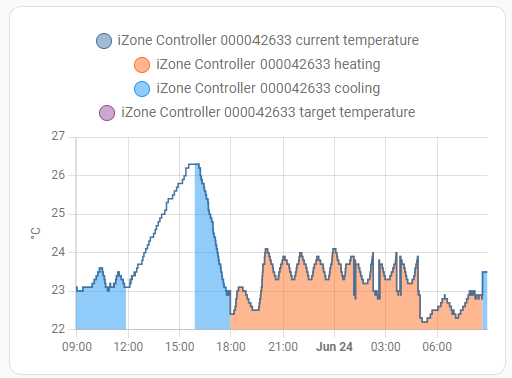
Instead the custom configuration, above, shows a lot more useful details.
Automation & Scenes
The iZone does have an automatic heat/cool mode, but I have found it has trouble with a multi-zone setup, especially if you have different target temperatures per zone.
The system selects the zone furthest away from it's target and makes that the control zone, switching to the relevant mode, and turning off any other zone that has already reached it's target.
However this can lead to the system alternating between heating and cooling, e.g. an upstairs room is too hot, so it turns on cooling, but then a downstair room becomes the furthest away as too cold, so the system turns on heating, then after a while switches back.
This is not very good for the overall system to constantly reverse modes.
So I have found it better to explicitly set it to either heat or cool, depending on the prevailing environment, and leave it in that mode.
e.g. On a summer day keep it on cooling mode, or on a winter early morning run in heating mode.
Climate scenes
To manage this, I have set up several scenes:
- Climate - cool high 23 (for hot days)
- Climate - heat auto 23 (for cold mornings)
- Climate - cool upstairs high 22.5 (to cool down bedrooms on summer nights)
- Climate - cool upstairs auto 22.5 (cool down on other nights)
For the hotest days I've found the auto fan setting isn't enough and I have to set it to high. For hot nights the bedrooms are upstairs, so I just turn on those zones.
Use your File Editor to add the following to scenes.yaml. You need to give each scene a unique id so that it can be editted in the web UI.
Once saved, use Developer tools > YAML to Check Configuration and then reload Scenes.
You will be able to see the scenes in Settings > Automation & scenes > Scenes. If you edit them in the UI the entities will become a lot more verbose as they will include all attributes.
- id: 'climate_heat_auto_23'
  name: Climate - heat auto 23
  icon: mdi:home-thermometer-outline
  entities:
    climate.izone_controller_000042633:
      fan_mode: auto
      state: heat
    climate.downstairs:
      state: heat_cool
      temperature: 23
    climate.master_bed:
      state: heat_cool
      temperature: 23
    climate.study:
      state: heat_cool
      temperature: 23
    climate.upstairs:
      state: heat_cool
      temperature: 23
- id: 'climate_cool_high_23'
  name: Climate - cool high 23
  icon: mdi:home-thermometer-outline
  entities:
    climate.downstairs:
      state: heat_cool
      temperature: 23
    climate.izone_controller_000042633:
      fan_mode: high
      state: cool
    climate.master_bed:
      state: heat_cool
      temperature: 23
    climate.study:
      state: heat_cool
      temperature: 23
    climate.upstairs:
      state: heat_cool
      temperature: 23
- id: 'climate_cool_upstairs_auto_22_5'
  name: Climate - cool upstairs auto 22.5
  icon: mdi:home-thermometer-outline
  entities:
    climate.downstairs:
      state: heat_cool
      temperature: 23
    climate.izone_controller_000042633:
      fan_mode: auto
      state: cool
    climate.master_bed:
      state: heat_cool
      temperature: 22.5
    climate.study:
      state: heat_cool
      temperature: 23
    climate.upstairs:
      state: heat_cool
      temperature: 22.5
- id: 'climate_cool_upstairs_high_22_5'
  name: Climate - cool upstairs high 22.5
  icon: mdi:home-thermometer-outline
  entities:
    climate.downstairs:
      state: heat_cool
      temperature: 23
    climate.izone_controller_000042633:
      fan_mode: high
      state: cool
    climate.master_bed:
      state: heat_cool
      temperature: 22.5
    climate.study:
      state: heat_cool
      temperature: 23
    climate.upstairs:
      state: heat_cool
      temperature: 22.5
You can organise your Scenes into categories (e.g. Climate) in the UI.
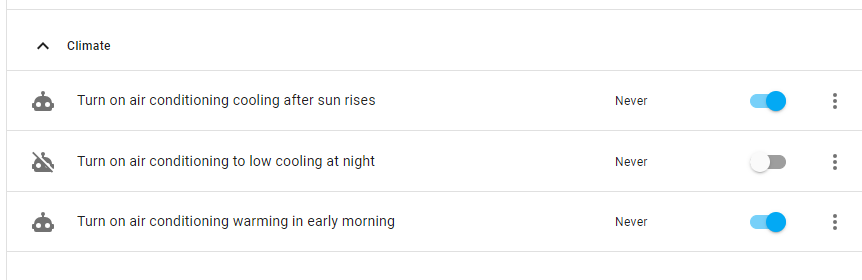
Climate automations
Generally I want to automatically turn on the cooling before the sun heats things up too much. If it turns out a colder day and the temperature never exceeds the target then nothing will happen.
In winter, if mornings are slightly chilly, I instead have some warming starting a bit before my alarm clock so the house is nice when I get up.
- Turn on air conditioning cooling after sun rises (for summer)
- Turn on air conditioning warming in early morning (for winter)
- Turn on air conditioning to low cooling at night
Use your File Editor to add the following to automations.yaml. Once saved, use Developer tools > YAML to Check Configuration and then reload Automations.
- id: climate_cool_after_sun_rises
  alias: Turn on air conditioning cooling after sun rises
  description: ''
  trigger:
  - platform: sun
    event: sunrise
    offset: 02:00
  condition: []
  action:
  - service: scene.turn_on
    target:
      entity_id: scene.climate_cool_high_23
- id: climate_warm_early_morning
  alias: Turn on air conditioning warming in early morning
  description: ''
  trigger:
  - at: 05:00
    platform: time
  condition: []
  action:
  - service: scene.turn_on
    target:
      entity_id: scene.climate_heat_auto_23
- id: climate_cool_night
  alias: Turn on air conditioning to low cooling at night
  description: ''
  trigger:
  - at: '21:00:00'
    platform: time
  condition: []
  action:
  - service: scene.turn_on
    target:
      entity_id: scene.climate_cool_upstairs_auto_22_5
After reloading go to Settings > Automations & scebnes > Automations, and you can manually configure which automations you want on or off. You can also create automations directly in the UI if you prefer.
Next steps
A more complex heating/cooling configuration could be set up by taking into account the overall targets vs current temperature, the outside weather, and the time of day (daytime sun will mean we expect future heating while nighttime will expect to be cold).
This could determine at what point during the day to switch to cooling mode, if at all (a cold winter day may remain heating), and conversely at what point at night to switch to warming, if at all (hot summer nights may require to keep cooling on), or when to switch off (such as while people are asleep).
The target temperature could also be further adjusted per zone for the different scenarios.
By using the overall scenario, we can pick one mode for the unit, rather that the automated mode that may frequently switch from heating to cooling, fighting against itself.
With additional occupancy sensors in your Home Assistant you could further optimise based on which rooms are occupied.
If you are budget conscious you could also co-ordinate climate control with solar production to minimise costs (although usually a hot day and high solar production are already strongly correlated).