
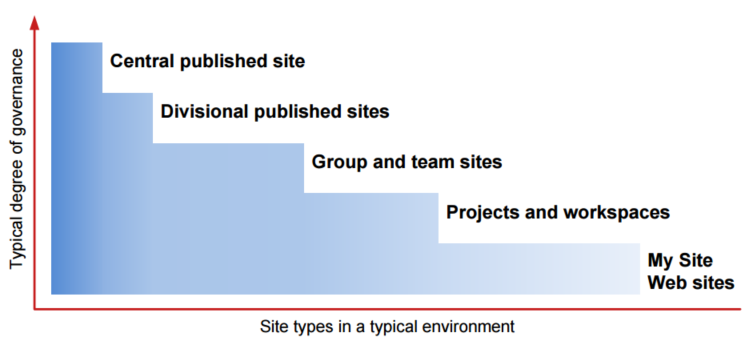
A SharePoint deployment typically has different types of sites, with different levels of governance. The central published site usually has tight governance over structure and information, whereas group and team sites have less restrictions and more flexibility.
This guidance is around team sites, where although the site collection must initially be set up by a SharePoint administrator, at least some team members have administration permissions to the site and can manage the site schema and structure.
Sites
Team site collection
A team site is a site collection designed for collaboration within one team or project. It must be created by a SharePoint administrator and in SharePoint Online will have an address like:
- https://.sharepoint.com/teams/
- https://.sharepoint.com/sites/
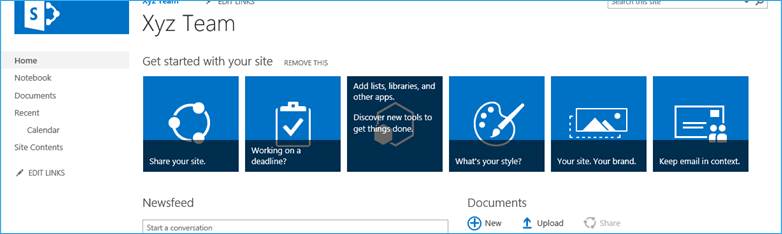
Team sites generally have fewer restrictions than the main portal, providing more flexibility for the team. The default team site looks like this:
Branding
After creation the SharePoint administrator may have applied branding, or there may be a feature or App to apply branding. Use Settings (the gear icon in the top right) > Site settings > Change the look to customise (although stick with your corporate brand if available).
Subsites
A team site may itself have several subsites, however they will all operate within the same security context, and, from a systems management point all subsites are within the same database (for backup and other management purposes).
To create a subsite, go to the site contents either from the Quick launch (left hand side navigation), or the Settings menu (top right gear icon):

Subsites are listed at the bottom. To create a new subsite, click “new subsite”.

If you are going to be creating a very large number of documents or want to team site to last a long time, a good default is to create a subsite for each year or financial year, e.g. “FY2016”. That way you will automatically be archiving old items and structures, with the structure of the subsite for each year evolving as your team does.
You will need to enter a name, description (optional), and web site address, and then select a template (Team Site is fine). You generally want to use the same permissions, and display on either the top link bar or the quick launch of the parent (but not both). Usually you will want to change the default to use the top link bar from the parent.
Libraries and lists
Document libraries
Documents are stored in libraries. A new team site starts with one default library just called Shared Documents. You can create new library apps by clicking “add an app”. Also note that if you delete documents there is a recycle bin they can be recovered from.

New libraries are created by the Document Library app:

Enter a name for the library and click Create. There are also Advanced Options where you can set the description and whether the library has versioning enabled or not.

If you don’t create subsites per year, and will have a smaller number of documents but the site will still last quite a while, then consider creating a library per year.
Once a document library has been added, the Library tab in the Ribbon allows you to access the Library Settings. You can also get quick access to change views or create new views from the Ribbon.

The settings allow you to change things such as the library name and whether versioning is enabled or not.

Further down in the settings you can manage the content types (if enabled in Advanced settings), columns, and views.
Pro Tip: When first creating a list, use a name with all words starting with capitals and no spaces, such as “MeetingMinutes”; after the list is created you can change the display name, but keep the original URL without spaces, and future SharePoint developers will thank you.
Other lists
There are many other types of lists that can be added to a team site, such as lists of links, announcements, a list of contacts, calendars, tasks, discussion boards, picture libraries, surveys, and custom lists. Add these from site content s “add an app”.

Custom columns and content types
Adding columns
You can add additional columns to lists and libraries, through the “Add from existing site columns” link in the library settings:

There are many different existing columns (and it is possible to create your own custom site columns, see below):

Tip: You can use Create column to create a new column directly in a list, however this is not recommended as you may find yourself with additional work to duplicate the column; it is generally better to use site columns and then “Add from existing site columns”.
Creating new site columns
Best practice is to always create reusable site columns. Even if you only plan to use a column once, a site column is good plan for future changes, especially if you create multiple subsites or lists.
Tip: You should always create reusable site columns at the top site of the site collection. Use the Settings > Site settings > Go to top level site settings to get there if necessary:

Site columns are created in Settings > Site settings > Site columns:

Many different types of columns are available, including text, choice (selection list), number, date, person, and image. You should create a group named after your company or team, e.g. “Xyz Columns”, to put your custom columns in, to make them easier to find.

Once created, site columns can be added to lists via “Add from existing site columns”. Reusing site columns ensures consistency in metadata across lists.
Pro Tip: When first creating a site column, use a name with all words starting with capitals and no spaces, such as “AnniversaryDate”. After the column is created, edit it and change the display name to something nicer. The internal name, useful in future customisation, will remain the original value without spaces, and any future SharePoint developers will thank you.
Term sets
As well as simple drop down choice lists, SharePoint has an advanced Managed Metadata column type (it is one of the last options under Name and Type when creating a new column), however first you must set up a term set under Settings > Site settings > Term store management.

Within the Term Store Management Tool you can access global term groups, as well as a term group for your team site collection. Your SharePoint administrator will need to grant you permissions to the term sets or term groups you want to manage.

From the management tool, you can create a new term set, or import one from a CSV file (a sample import file can be downloaded from the top page of the tool).

A term set can contain a hierarchy of terms, for example a list of financial sectors and sub-sectors. The hierarchy can be rearranged as necessary, including combining terms. Terms can also have alternative names (aliases).

Once a term set is created, a custom site column can be created via Settings > Site settings > Site columns, selecting type Managed Metadata, and referencing the term set (make sure to put it into a group). This site column can then be added to lists via “Add from existing site columns”.

Custom content types
The next level of customisation beyond site columns is site content types. A content type is simply a collection of columns that can be reused across different lists. Reusable content types are created from Settings > Site settings > Site content types. Make sure to create the content type at the top level site, and use a recognisable group name for organisation.

When creating you will need to select a parent content type; use Document Content Types > Document for content types that will be used in a Document Library, and List Content Types > Item for a content type that will be used in a Custom List. Once created you can use “Add from existing site columns” to construct the content type; you can also use “Add from new site column” directly.

To use a content type, first you need to turn on Allow management of content types in the Advanced settings of the Library or List.

You can add multiple content types to one Library or List, and when editing each item the relevant fields for that content type will be displayed. You can also change the default content type to your custom content type, and then edit and remove the basic content type (Document or Item).

Pages
Basic pages
A team site includes a Wiki Page Library, called Site Pages, which contains the home page for the site, as well as additional pages. Use Settings > Edit page to edit, or Settings > Add a page to add a new page.

You can also link to other pages using double square brackets, e.g. “[[Other Page]]”; this will create a link that when clicked on will create a new page.
Pages can contain formatted text, and several different text layouts are available:

You can also Insert widgets such as App Parts displaying list views, other web parts, and code (such as scripts or styles):

Publishing pages
For most team sites, basic pages are more than sufficient, however for more advanced (but more complicated) pages, using the publishing features (usually used on the central published site).
To enable this, go to Settings > Site settings > Site collection features and Activate the “SharePoint Server Publishing Infrastructure” feature, then Settings > Site settings > Manage site features and Activate “SharePoint Server Publishing”:

This will create a Pages library where you can create publishing pages (go to the Pages library and click New) that include more advanced layout and publishing options:

Security and permissions
Security is generally managed at the site collection level, with four main levels of permission:
| Level | Description |
|---|---|
| Site Collection Administrator | Has administration level permissions, the items in the Site Collection section of Site settings.
Ideally at least one person in the team should have this permission. |
| [Site Collection] Owner | Has full control over the content in the site, including adding new lists and libraries. |
| [Site Collection] Member | Can edit items in the site (contribute), but not change the structure or add new lists. Contributors can see draft items.
It is best to add individual users (rather than directory security groups) to the Members group of a team site, so that SharePoint can show a list of who is in the group and use it to determine relationships. For most team sites, the entire team should be added to the Members group. |
| [Site Collection] Visitor | Can view items in the site. Viewers can only see published items (major versions).
Commonly you might want to add collections of people to the visitors group, such as an Active Directory group, or simply the group “Everyone”. |
To give permissions to other users, click the Share button in the top level team site and enter their names. By default this will add them to the Members group, although you can confirm this by clicking Show Options. To see who already has permissions click Shared with.

Permissions apply to the site collection as a whole, and generally you do not want to change the permissions of the default groups.
If you want to change permissions, then create new groups. Examples:
- To add contribute permissions to a single list for users that are normally only visitors, then create a new group, e.g. “Event Contributors”, add the people to that group (as well as Visitors), and give that group the needed additional permissions.
- To create a secure section only accessible by a limited number of people, create a new subsite and select “Use unique permissions”. This will create a new set of [Subsite] Owner, [Subsite] Member, and [Subsite] Visitor groups in the site collection for that specific subsite.
Training resources
For additional information, see the following training resources.
These training resources from Microsoft are useful for a initial overview, and include quick reference guides for various operations. All the main users should run through these videos (most only a few minutes long), and you can include references in any corporate communication about the intranet.
A 15-minute introduction:
- Beginners Guide, http://blogs.office.com/2013/05/03/webinar-a-beginners-guide-to-sharepoint-online/
Two starting overview pages (one for SharePoint in general, one for OneDrive):
- SharePoint 2013, https://support.office.com/en-us/article/Get-started-with-SharePoint-2013-909ec2f0-05c8-4e92-8ad3-3f8b0b6cf261
- OneDrive, https://support.office.com/en-us/article/Start-using-your-team-site-OneDrive-for-Business-and-Newsfeed-to-share-documents-and-ideas-abeace23-ffb2-4638-944c-860a2484b4bb
A set of tutorials for SharePoint Online (I suggest you start with the ones about document libraries and then lists):
- Tutorials, https://support.office.com/en-us/article/SharePoint-Online-training-courses-videos-and-tutorials-2eb5e190-1c90-4987-908d-7c2263f40c5e
Download
You can also download this guide in MS Word format: SP2013 Team Sites Guide