
Install-Package IonFar.SharePoint.Migration
The common stack I am currently using to build SharePoint Online solutions generally consists of the following components:
- Visual Studio console application for remote provisioning
- IonFar Migration framework, https://www.nuget.org/packages/IonFar.SharePoint.Migration/
- Office Dev PnP PowerShell Commands, https://github.com/OfficeDev/PnP/tree/master/Binaries
- SharePoint Online Management Shell, https://technet.microsoft.com/en-us/library/fp161372.aspx
- An Office 365 Developer subscription (essential for anyone doing SharePoint development)
- A central Git repository (e.g. Visual Studio Online), for source control
- TeamCity build (e.g. hosted in Azure), for builds
- Octopus Deploy, for deployment
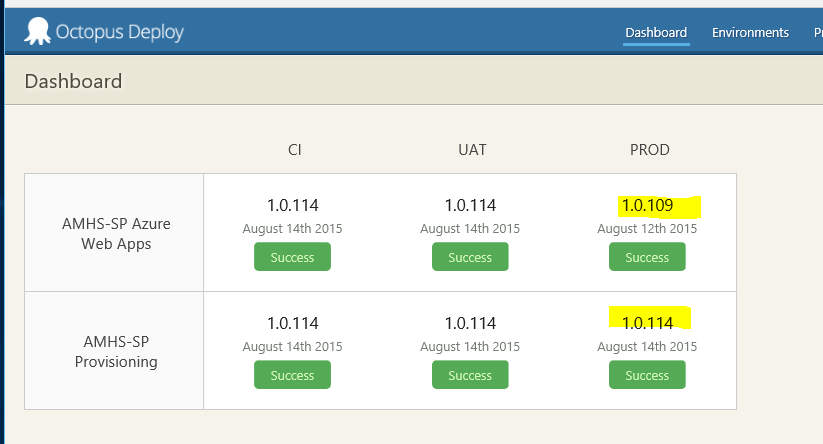
This stack allows automated deployment of the project against a continuous integration (CI) environment. Simple migration scripts (written in PowerShell) are cumulatively run against the environment, and can be easily promoted to a UAT and then Production environment.

IonFar SharePoint Migration framework
The key is the IonFar SharePoint Migration framework. This is largely modelled on the successful DbUp project (http://dbup.github.io/) and allows multiple migrations to be written and executed against a target environment.
I use PowerShell scripts, leveraging the SharePoint Online Client Components SDK and the Office Dev PnP PowerShell Commands, as they are easy to develop interactively. Typical development consists of opening a PowerShell prompt, connecting to a development site collection in my Office 365 Developer subscription, and then writing a feature script one line at a time. Using an interactive session makes it easy to examine state as the feature is assembled, or test out different variations of a command.
Once a feature is complete, I will give it a full run through against a separate test site collection in my Office 365 Developer subscription, before checking it in to the automatically built and deployed to CI.
Once run, migrations are journalled to the target SharePoint site, so they are only ever run once (this also means you can't change a migration once it has run). The framework is extensible; currently it journals to the site collection root web property bag, but this could be changed (e.g. to a list).
IonFar also supports code-based migrations, but I find PowerShell a lot easier to develop. With code-based if something goes wrong it is time consuming to re-run in debug mode, recreate the state, or to skip, rerun, or test variations on commands.
Several examples are available in the GitHub project, https://github.com/jackawatts/ionfar-sharepoint-migration, so I won't repeat them here, and the library is also available via Nuget.

File Synchronisation
(Yes, the code uses the Americanized spelling.)
For many aspects of SharePoint development you aren't using the API to provision components, but just want to upload files and ensure the latest versions are loaded (e.g. CSS files, images, client-side scripts).
There is an additional component in the IonFar Migrations project that will ensure a folder is synchronised to a target folder in SharePoint Online. It checks each file and if not present, will upload it, taking care of any required check out, check in, publishing and approval needed.
For each file it also keeps a record of the hash of the uploaded file. The next time it runs, it compares the files in the folder against the stored hash values and only uploads those that have changed. If there is no change, then nothing is uploaded, and for those that do change there is a neat file history listing each update.
Like the migration component, the parts of easily extensible, so rather than store the hash values in a property bag they could be stored in a local file or even checked against a downloaded copy of the current file.
Update the world
It is common in our projects to have a top level batch file UpdateTheWorld.ps1, possibly with a companion ResetTheWorld.ps1.
This batch file should build the entire project in a single step. The first thing a new developer on the project does (after getting the source code) is run this batch file. It will compile the entire project, and the deploy everything to their local development environment.
It not only runs the provisioning console app against your Office 365 Developer subscription, but also sets up things like any local databases needed for Provider-hosted Add-Ins and the like.
Being able to build in one step is one of the questions on the classic Joel Test and fantastic for getting people up to speed and productive on your project.
Team City build
The Team City build is pretty straight forward, usually with the following:
- Restore NuGet dependencies.
- Compile the solution; Octopack is enabled for the provisioning console app and any Azure Add-Ins.
- Run unit tests.
- Publish the packages, pushing them to Octopus Deploy. The provisioning is triggered to run automatically.
- As we had multiple Azure Add-Ins in this example, instead of triggering automatically, the deployment was started as a separate step.

Other key settings are using a build number format %major.minor%.%build.counter% (with major.minor defined as a parameter), and turning on the AssemblyInfo patcher build feature (using %major.minor%.0.0 for AssemblyVersion, and %major.minor%.%build.counter%.0 for AssemblyFileVersion).
Octopus Deploy
The steps in Octopus Deploy are also very simple — simply deploy the provisioning package and then run the provisioning console app, passing in the relevant parameters.
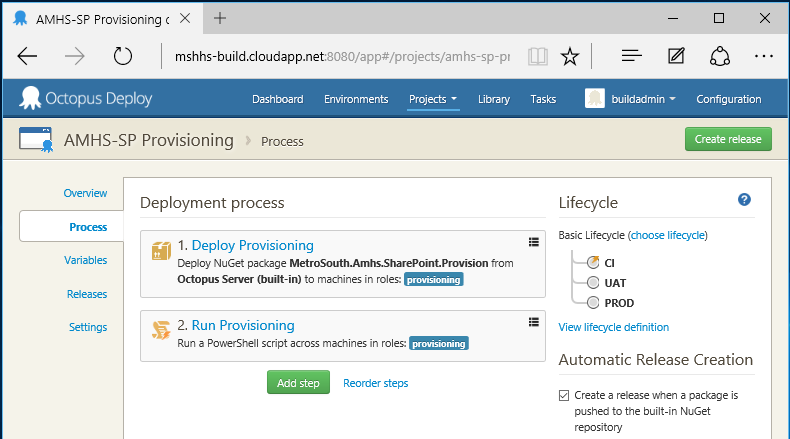
The PowerShell to run the unpacked provisioning console app is simple:
$SiteCollectionUrl = $SiteCollectionUrl.toLower()
$packageDir = $OctopusParameters["Octopus.Action[Deploy Provisioning].Output.Package.InstallationDirectoryPath"]
Write-Host "Package directory: $packageDir"
$migration = Join-Path $packageDir "MetroSouth.Amhs.SharePoint.Provision.exe"
& $migration -Url $SiteCollectionUrl -UserName $AdminUsername -Password $AdminPassword
The three variables (SiteCollectionUrl, AdminUsername, AdminPassword) are easily configured with the relevant values for each environment in your lifecycle.
If the solution also includes SharePoint Add-Ins, a separate Octopus Deploy project is used to deploy them to Windows Azure, using Web Deploy.
Drawbacks
Compared to several other approaches I have tried (plain PowerShell scripts run manually, or C# based migrations), the PowerShell scripts run by IonFar Migrations are the best so far.
I find authoring PowerShell scripts extremely quick, compared to compiled C# code. Yes, in theory with the debugger you could skip statements to get back to a particular point, pause, and try out things, but I just find it a lot easier with PowerShell.
Combining scripts with the IonFar Migrations framework, to automatically pass parameters, run, and record which scripts have been run against an environment, is what allows the process to achieve automated continuous deployment.
There are, however, still several limitations it is good to be aware of:
Not everything is scriptable
There still seems to be the odd bit of SharePoint Online which is not scriptable. One notable example is deployment of Add-Ins from the App Catalog. It is possible to enable side loading and upload directly, but that isn't appropriate for Production. Uploading them to the App Catalog should work (it is just a library), but I haven't found a way yet to deploy a catalog app to a web (although I do know how to delete them).
Our work around at the moment is to mainly use Provider-hosted Add-Ins, and make the actual Add-In as thin as possible (with most logic in the Azure website). The .app file is uploaded manually to the App Catalog, and then deployed manually to the site; usually the .app doesn't change much, so often this only needs to be done once. After that the automated deployment happily updates both things in the host web and the Azure website.
P.S. If you have a solution, please let me know.
Handling existing starting state
So long as you start with automated deployments from the begining and the users never change anything, then it all works smooth. However, that never happens.
As soon as users start to manually change things (rename libraries, move menu items around, add new sites), it gets a bit messy. It is hard to reproduce and fix a problem in your Development environment for a newly created site that only exists in Production.
With a SQL database migration solution (like DbUp), the easy solution is to periodically take a snapshot of the Production database (anonymise / reduce as necessary) and reset other environments by restoring that.
An equivalent solution doesn't exist in SharePoint Online (there are some 3rd party solutions), so you just need to take this into account, e.g. Add a script that only runs if the site does not exist and sets up the bare essentials to fix the problem.
Failed scripts (no transactions)
Again, failed scripts are easy to handle in a SQL database by using a transaction that is rolled back when there is a failure.
Unfortunately there is no equivalent transaction support in SharePoint Online, so a failed script can leave the system in an inconsistent state.
If this is early in the lifecycle, e.g. Development environment or maybe CI, then a few scripted commands to roll back any broken changes to try again are usually good enough.
For later in the lifecycle, e.g. failed deployment to Production, the quickest solution is probably to grab the failed script, find the point at which it failed, and then manually run the remaining commands to bring the environment to a known consistent state. The script can then be added manually to the journal (e.g. property bag) so that the IonFar Migration framework knows it has been run and then the provisioning restarted (it will start from the next script).