LoRaWAN devices are a popular solution for IoT, with many benefits, but they cannot connect directly to Azure IoT.
LoRaWAN devices communicate using LoRa to a local LoRaWAN gateway, which then communicates using standard protocols to a LoRaWAN network server. Only then can it be converted to a suitable IP-based protocol to connect to Azure IoT.
Even if they did share a common network, LoRaWAN IoT devices are often small, low-power, battery operated devices that operate in short bursts of minimal communication, and not the verbose communication expected by Azure IoT, so you would want to use a gateway anyway.
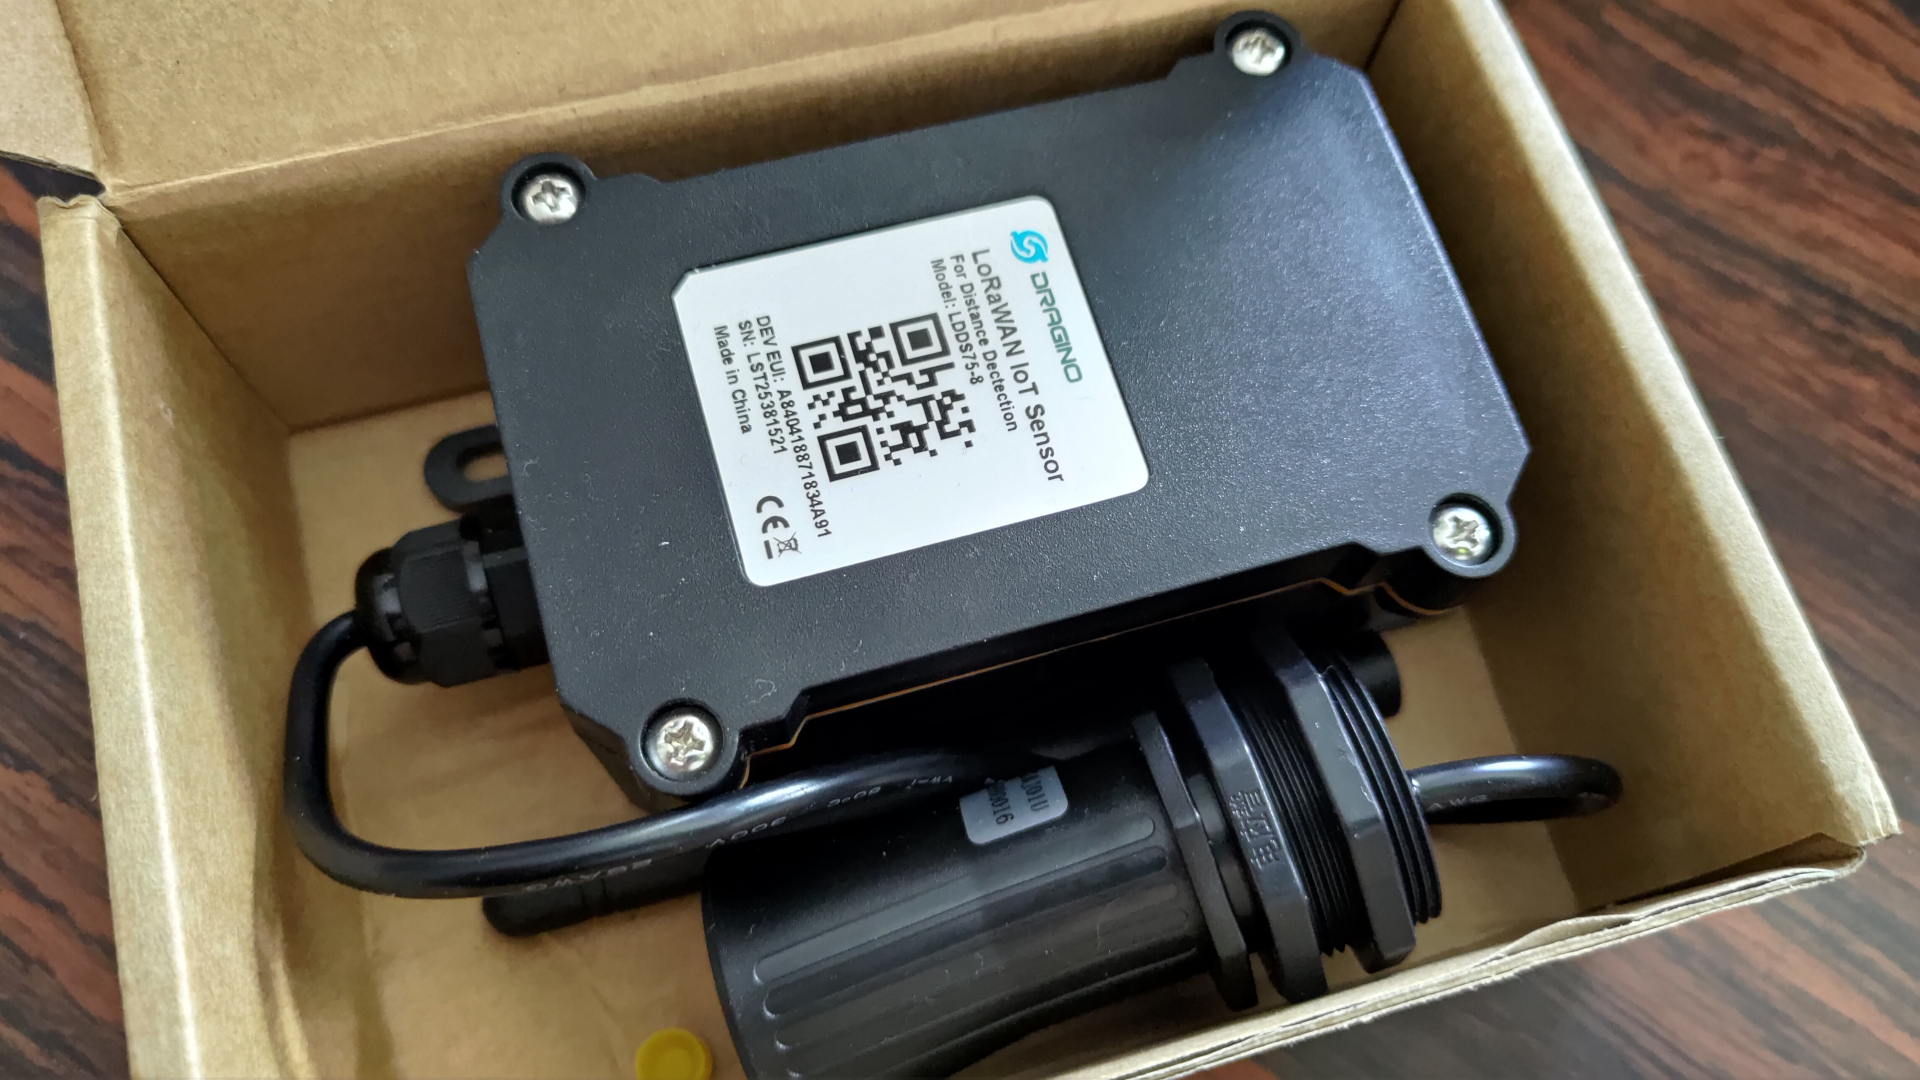
To test out connecting field-ready LoRaWAN devices to Azure IoT, I ordered a Dragino LDDS75 LoRaWAN Distance Detection Sensor, used to measure the distance between the sensor and a flat object. It can be used for both horizontal and vertical distance measuring, such as liquid level measurement or object detection (e.g. parking space).
The Dragino platform uses open source hardware, with Dragino schematics and details fully available on github, although you are probably better off purchasing one than trying to build it yourself.
I set up the device up using The Things Network, a community network suitable for small scale testing, connected to Azure IoT.
The Things Network
The user manual for the Dragino LDDS75 is available for download.
It uses an example of connecting the sensor to The Things Network, with easy to follow steps.
The Things Network version 3 (TTNv3) runs on The Things Stack Community Edition, a free, community based deployment of The Things Stack (the Stack is a LoRaWAN Network Server developed and maintained by The Things Industries).
The Things Stack Community Edition can be accessed via the TTN Console
The closest cluster to me is the Sydney, Australia TTN cluster
You can easily register an account and log in.
Activating devices
First of all, you need to create an Application (a group), with a unique name, e.g. xyz-iotdemo-001.
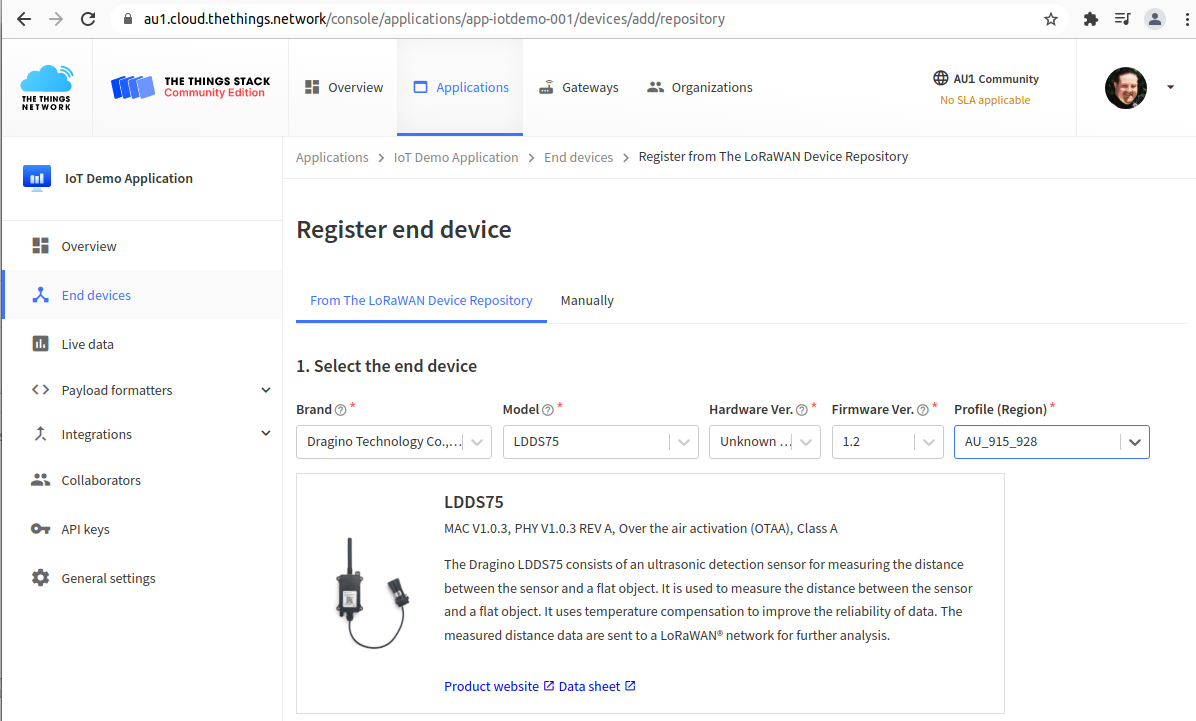
Then choose Add end device.
The Dragino device is already in the catalog, so select brand Dragino Technology, model LDDS75.
The TTN catalog does not have hardware version details, with the only choice "unknown hardware versoin"; I also pick firmware version 1.2 (the latest), with region profile Australia (AU_915_928).
The LDDS75 supports over the air activation (OTAA), so I just need to configure the ID and it will connect automatically.
For frequency plan, select Australia 915-928 MHz, FSB 2 (used by TTN), and fill in the AppEUI, DevEUI, and AppKey from the registration key details that came with the device.
Keep the default device ID (based on the EUI), and click Register end device.
Power on
Following the manual, I unscrew the waterproof casing, then connect the power on jumper, and the sensor and communication LEDs start flashing.
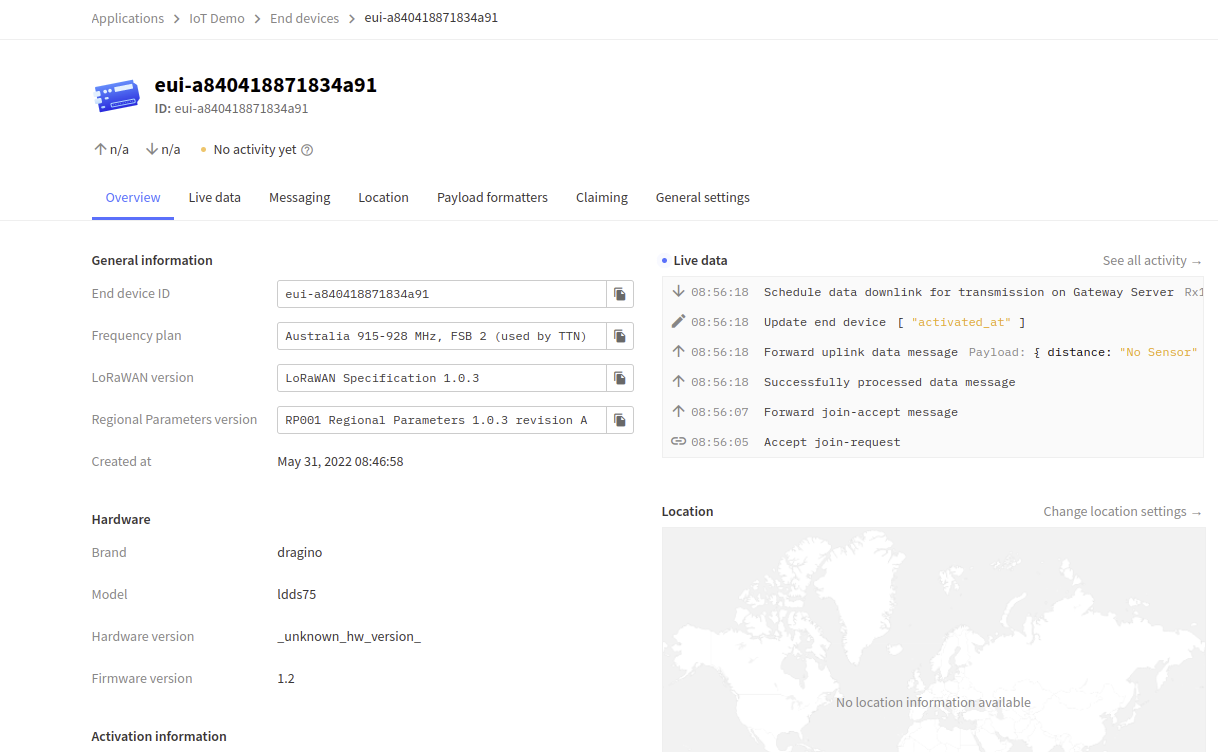
After a short delay, the live data starts coming through with the initial join request.
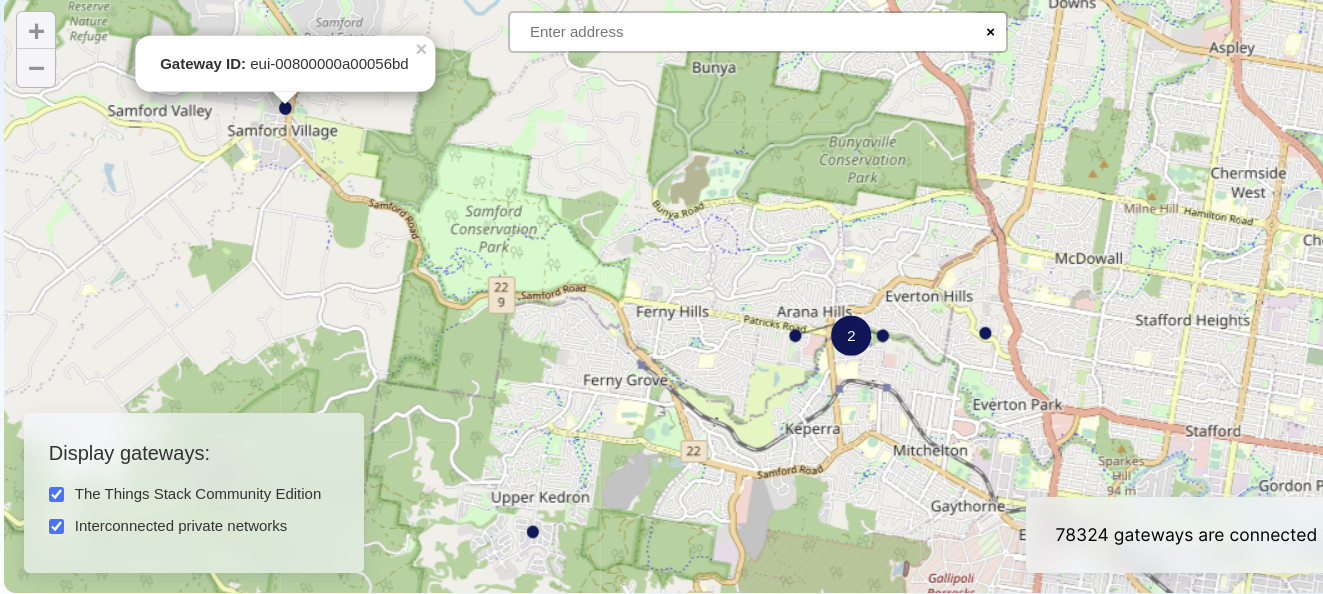
Note that you have to be in a TTN coverage area for this to work.
If you are not in a coverage area, your device won't be able to connect. In that case, you can always purchase a LoRaWAN gateway and become part of the community network! (The gateway does not have to be registered to the same account as the device.)
The default uplink frequency is every 20 minutes, so you need to wait a bit for the next reading. After 20 minutes the LEDs will flash again and the next reading appear. You can change this to be more frequent for testing, but that will quickly exhaust battery life.
The data initially comes in as a binary payload, e.g. "03 3A 00 14 00 00 00 01", which needs to be decoded. Note that the payload is a very small encoded package, ideal for a low-power, battery powered device, just eight bytes — barely enough for a JSON label in a full Azure IoT message.
The distance detector has a minimum distance of 28 cm, so make sure that it is pointed at an object some distance away (maximum 7.5m).
Payload decoding
The manual contains instructions on the format of the bytes, and how to decode them. It also has a link to some sample decoder files at: https://www.dragino.com/downloads/index.php?dir=LoRa_End_Node/LDDS75/Payload/ (the link has changed slightly from the one in the manual).
I based my decoder on the LDDS75_Decoder_V1.1.4.js code, which supported the 8-byte payload. The file LDDS75 decoder--TTN.txt is very similar to the 'Use Device Repository formatters' default in TTN, and is for an older 6-byte payload.
I modified the formatter to return the measurement values as numbers, rather than strings, for easier future processing (graphing, etc), and included the units in the field names.
In TTN, go to the Payload formatters tab, select 'Custom Javascript formatter', and paste in the following formatter code:
function Decoder(bytes, port) {
  // Decode an uplink message from a buffer
  // (array) of bytes to an object of fields.
  var value=(bytes[0]<<8 | bytes[1]) & 0x3FFF;
  var batV=value/1000;//Battery,units:V

  value=bytes[2]<<8 | bytes[3];
  var distanceM=value/1000;//distance,units:m

  var i_flag = bytes[4];

  value=bytes[5]<<8 | bytes[6];
  if(bytes[5] & 0x80)
  {value |= 0xFFFF0000;}
  var temp_DS18B20=(value/10);//DS18B20,temperature,units:Cel

  var s_flag = bytes[7];
  return {
    Battery_V:batV,
    Distance_m:distanceM,
    Interrupt_flag:i_flag,
    Temp_Cel:temp_DS18B20,
    Sensor_flag:s_flag,
  };
}
You can put a value into the Test: Byte payload section and click Test decoder to check it is working.
Once the formatter is set up, wait for some more data and the decoded payload will show the sensor (and battery) readings.
(If you want the initial messages to be formatted, then set up the payload formatter before turning the device on.)
Aside: IoT in a Box
The Dragino LDDS75 is certified in the Azure Device Catalog as IoT Plug and Play.
However the certified version is for running the device through myDevices / IoT in a Box, with additional hardware and subscription dependencies.
There is a Getting Started PDF you can downloaded from the catalog page for using the device this way, with the first instructions to create a free IoT in a Box account.
After you sign up, before you can access the menu you need to create a company and location; creating your first will automatically then go to the Add Gateway step.
Unfortunately neither the Add Gateway nor Add Device worked with the different devices I had.
I also tried the mobile app, which scanned the QR code on the devices, but it also just reported 'invalid ID'.
It could be because I have not installed with a compatible gateway, or it could be because of changes with myDevices / IoT in a Box platform.
Looking more at the myDevices / IoT in a Box platform, the integration layer has gone through some changes. It is even mentioned on the Dragino wiki, but with a configuration as part of The Things Network.
There is also a DTDL Device model available in the Azure Device Catalog for the LDDS75, however that model is based on the mydevicesinc connection, not The Things Network, so we create our own model (see below).
Integration with Azure IoT
The Things Network includes a number of built in integrations, including MQTT, Webhooks, Storage, AWS IoT, and Azure IoT.
Azure IoT
The Azure IoT integration supports both Azure IoT Central, for rapid application dashboards, and Azure IoT Hub for fully flexible integration.
The IoT Central guidance covers the architecture, setup, and usage, including setting up Device Twins.
Storage
By default TTN will only show live data, that won't persist beyond the current session.
For longer term you can enable the Storage integration (not part of Azure).
Note that for the Community Edition, this only stores messages for 24 hours, which is just long enough to store some offline data. You can sign up for a Cloud or Enterprise agreement for longer storage.
Azure IoT Central
The simpler (but less flexible) integration is to an IoT Central application.
Deploy Azure resources
An IoT Central application requires a globally unique subdomain. For a demo application you can generate a name based on your subscription ID.
az login

$OrgId = "0x$((az account show --query id --output tsv).Substring(0,4))"
$Environment = 'Dev'
$Location = 'australiaeast'

$appName = 'ttndemo'
$rgName = "rg-$appName-$Environment-001".ToLowerInvariant()
$iotcName = "iotc-$appName-$Environment".ToLowerInvariant()
$iotcDisplayName = 'Azure IoT Central - The Things Network demo'
$iotcSubdomain = "$appName-$OrgId-$Environment".ToLowerInvariant()

$TagDictionary = @{ WorkloadName = 'ttndemo'; DataClassification = 'Non-business'; Criticality = 'Low'; BusinessUnit = 'Demo'; ApplicationName = $appName; Env = $Environment }
$tags = $TagDictionary.Keys | ForEach-Object { $key = $_; "$key=$($TagDictionary[$key])" }

az group create -g $rgName -l $Location --tags $tags

az iot central app create -n $iotcName -g $rgName -s $iotcSubdomain --sku ST0 --display-name $iotcDisplayName
This follows the standard naming and tagging conventions from Azure Cloud Adoption Framework, with the additional organisation or subscription identifier (after app name) in global names to make them unique.
After creation you will have an IoT Central application created at a unique URL like https://ttndemo-0xacc5-dev.azureiotcentral.com
Cleanup
When you are finished experimenting, clean up the resources (and make sure you turn off the sensor, to not use up the battery):
$Environment = 'Dev'
$appName = 'ttndemo'
$rgName = "rg-$appName-$Environment-001".ToLowerInvariant()
az group delete --name $rgName
Device integration from TTN to IoT Central
Unfortunately while you can create an IoT Central application using Azure CLI, you can't get direct access to the internals such as the Device Provisioning Service (DPS) used, so you need to configure it manually through the web interface.
IoT Central may not be suitable for a full enterprise application, e.g. with different environments (Integration, Test, Prod), depending on your needs, as it can't be fully automated, but it is a quick way to build a demonstration app.
Iot Central: Open your IoT Central application, e.g. https://ttndemo-0xacc5-dev.azureiotcentral.com
Go to Security > Permissions, then Device connection groups, and click on SAS-IoT-Devices.
Take note of the ID scope (at the top), and the Shared access signature (SAS) Primary key.
The Things Network: In the TTN console, go to Integrations > Azure IoT, and expand the Azure IoT Central section.
Enter the ID scope and Primary Key, and click Enable Azure Central Central integration.
Once connected, this will allow TTN to register devices in IoT Central -- if you check the Connect > Devices section you should see the sensor appear and messages start to flow through.
Property change data export from IoT Central to TTN
To send property changes from Azure IoT, back through TTN to the device, you need to set up an export configuring, using the webhook credentials in TTN. This simple demo doesn't have any downstream messages, but the process is also relatively simple:
The Things Network: In the TTN console, go to Integrations > Azure IoT, and expand the Azure IoT Central section.
Click on Generate API Key, and take note of the Data Export address and the API key value.
Iot Central: Go to Extend > Data export, and then select the Destinations tab.
Select Add a destination, and then give it a name, e.g. 'the-things-network'.
Select Destination type Webhook, put the Data Export address in the Callback URL, select Authorization token as the Authoriation, and then enter the API key in the Value.
Click Save (at the top).
Then select the Exports tab and click Add an export, and give it a name, e.g. 'ttn-property-change-export'.
Select type of data to export as Property changes, and click "+ Destination" to add your destination and then "+ Transform" to add a transformation.
Use the transformation from the TTN guidance, to map the Azure IoT Central property changes to TTN format.
Click Add and then Save.
Device templates
A device template, specified in Digital Twins Definition Language (DTDL) can be used to extra the relevant data values from the Property and Telemetry messages from the device.
For TTN, there is some guidance on creating a DTDL device twin template
You can also auto-generate a template based on the data coming from the device. Go to Connect > Devices and select the device. In the menu at the top select Manage template > Auto-create template. Delete the parts that you don't want to model, and then click Create, and a hierarchical template will be generated.
You can use the auto-generated template as a basis, combined with the instructions from TTN, to build a model focussed on the important values.
Build the DTDL model
According to the documentation, TTN uses a special format of the model identifier that automatically associates with devices: "dtmi:ttnlwstack:brand:{brandID}:model:{modelID}:hwversion:{hwVersion}:fwversion:{fwVersion}:band:{bandID};{generation}"
However, as the Dragino has hardware "_unknown_hwversion", with and underscore at the end, the closest I could get was the following, so I'm not sure it works automatically: "dtmi:ttnlwstack:brand:dragino:model:ldds75:hwversion:hw_unknown_hw_version:fwversion:fw1_2:band:AU_915_928;1"
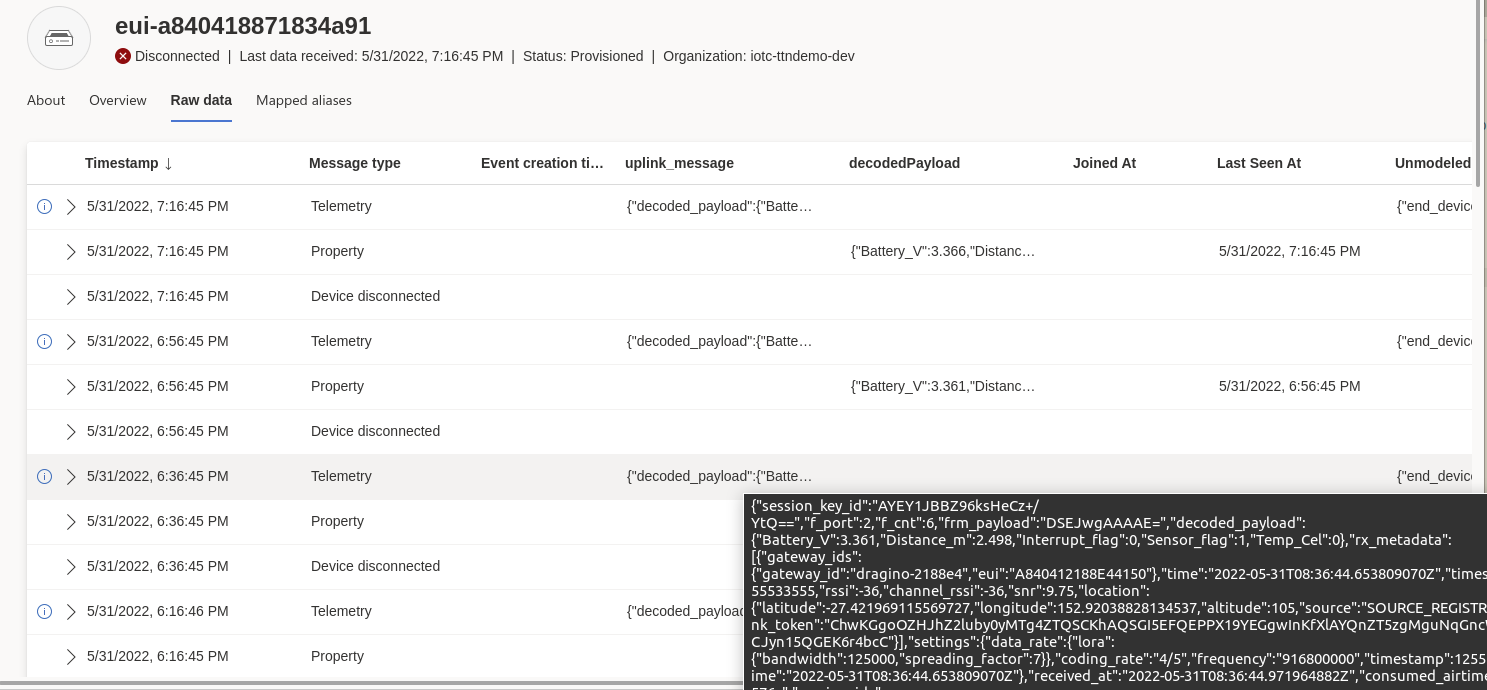
The key values are the battery level and distance measurement (I don't have a temperature sensor connected), which are sent as both telemetry and properties, as well as the last seen at property. There is also a joined at property sent by the TTN (you will only see this if you remove the device and re-join it).
The following DTDL sets up the structure of these key values and ignores the rest of the message details sent. You can modify to include the relevant information for your usage scenarios.
{
    "@id": "dtmi:ttnlwstack:brand:dragino:model:ldds75:hwversion:hw_unknown_hw_version:fwversion:fw1_2:band:AU_915_928;1",
    "@type": "Interface",
    "contents": [
        {
            "@id": "dtmi:ttnlwstack:uplink_message;1",
            "@type": "Telemetry",
            "displayName": {
                "en": "uplink_message"
            },
            "name": "uplink_message",
            "schema": {
                "@id": "dtmi:ttnlwstack:uplink_message:schema;1",
                "@type": "Object",
                "fields": [
                    {
                        "@id": "dtmi:ttnlwstack:uplink_message:schema:decoded_payload;1",
                        "displayName": {
                            "en": "decoded_payload"
                        },
                        "name": "decoded_payload",
                        "schema": {
                            "@id": "dtmi:ttnlwstack:uplink_message:schema:decoded_payload:schema;1",
                            "@type": "Object",
                            "fields": [
                                {
                                    "@id": "dtmi:ttnlwstack:uplink_message:schema:decoded_payload:schema:Battery_V;1",
                                    "displayName": {
                                        "en": "Battery (V)"
                                    },
                                    "name": "Battery_V",
                                    "schema": "double"
                                },
                                {
                                    "@id": "dtmi:ttnlwstack:uplink_message:schema:decoded_payload:schema:Distance_m;1",
                                    "displayName": {
                                        "en": "Distance (m)"
                                    },
                                    "name": "Distance_m",
                                    "schema": "double"
                                }
                            ]
                        }
                    }
                ]
            }
        },
        {
            "@id": "dtmi:ttnlwstack:decodedPayload;1",
            "@type": "Property",
            "displayName": {
                "en": "decodedPayload"
            },
            "name": "decodedPayload",
            "schema": {
                "@id": "dtmi:ttnlwstack:decodedPayload:schema;1",
                "@type": "Object",
                "fields": [
                    {
                        "@id": "dtmi:ttnlwstack:decodedPayload:schema:Battery_V;1",
                        "displayName": {
                            "en": "Battery_V"
                        },
                        "name": "Battery_V",
                        "schema": "double"
                    },
                    {
                        "@id": "dtmi:ttnlwstack:decodedPayload:schema:Distance_m;1",
                        "displayName": {
                            "en": "Distance_m"
                        },
                        "name": "Distance_m",
                        "schema": "double"
                    }
                ]
            },
            "writable": false
        },
        {
            "@id": "dtmi:ttnlwstack:lastSeenAt;1",
            "@type": "Property",
            "displayName": {
                "en": "Last Seen At"
            },
            "name": "lastSeenAt",
            "schema": "dateTime",
            "writable": false
        },
        {
            "@id": "dtmi:ttnlwstack:joinedAt;1",
            "@type": "Property",
            "displayName": {
                "en": "Joined At"
            },
            "name": "joinedAt",
            "schema": "dateTime",
            "writable": false
        }
    ],
    "displayName": {
        "en": "Dragino LDDS75 Distance Detection"
    },
    "@context": [
        "dtmi:iotcentral:context;2",
        "dtmi:dtdl:context;2"
    ]
}
Upload the model
To create the template, in IoT Central, select Connect > Device templates, then Create a device template, and select IoT device, then Next: Customise.
Enter a template name, e.g. 'Dragino LDDS75 Distance Detection', then Next: Review, and then Create.
Select Custom model, then click Edit DTDL, and paste in the template definition. Click Save, and then close the editor to see the template.
Click Publish (at the top), and then Publish to confirm.
Issues? I had some weird errors when I first tried to publish that went away after I went to Views > Generate default views, but it didn't happen again after that, so could have just been a coincidence.
Assign the template
To assign the template, go to Connect > Devices, and then select the device. In the top menu, select Manage Template > Assign Template, and you can associate the device with the template.
Once created the Raw data will show the extract top level elements for the Property and Telemetry messages.
Assigning the template will also automatically create a Device group for all devices that use that template.
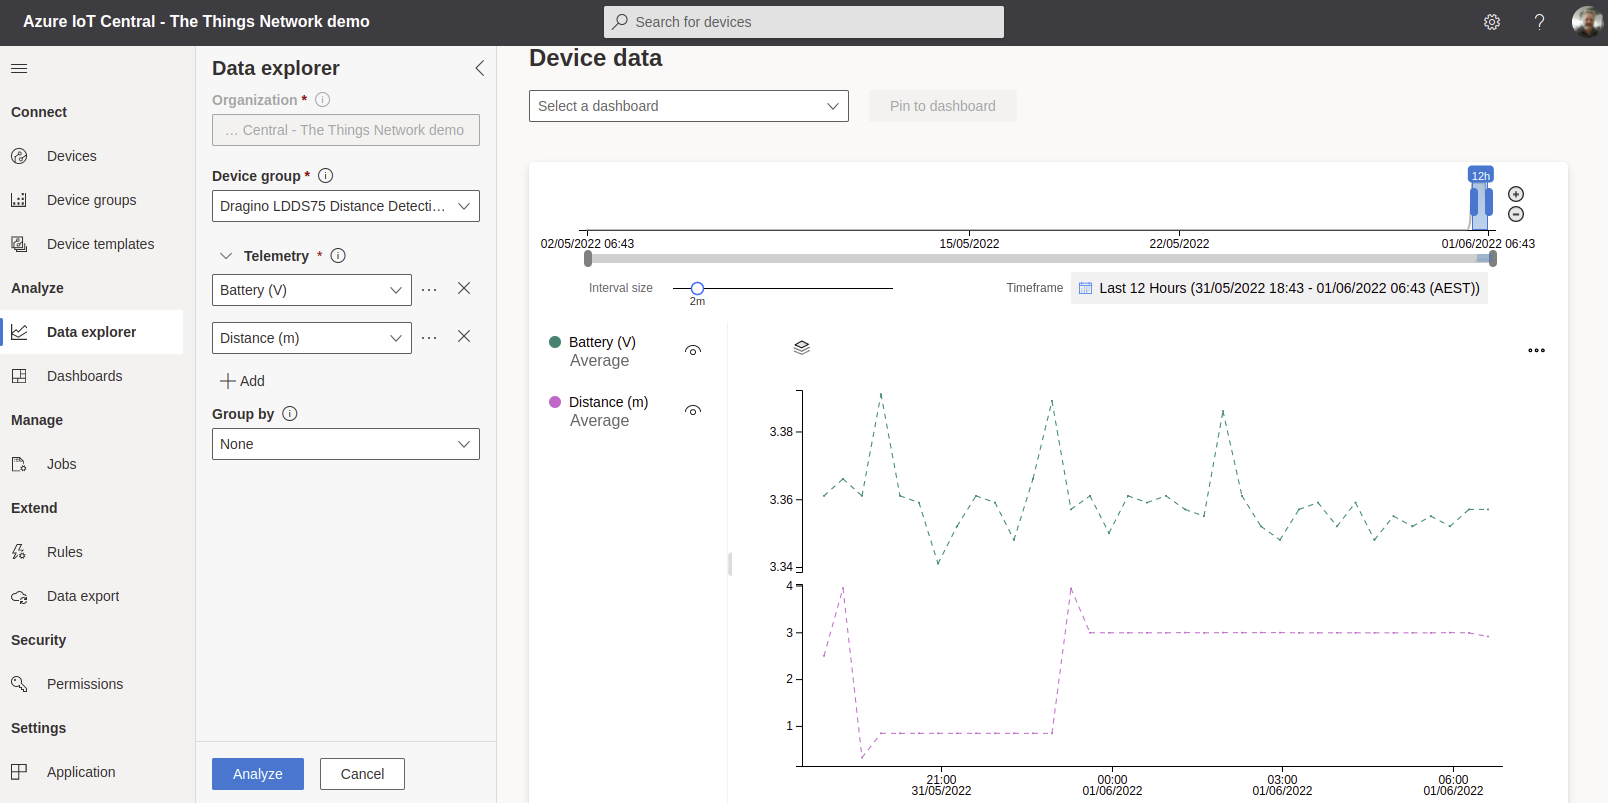
In Analyze > Data Explorer, you can add the telemetry values for Battery (V) and Distance (m) to a graph, and start seeing values.
Device dashboards
In the Device Template, you can use the Views section to generate default views, which will and About and Overview tabs to devices, which you can customise with device properties and graphs.
Publish the template again to see the dashboards.
Next steps
While having to go through a LoRaWAN gateway might seem like overhead, compared to devices that can connect directly to Azure, for low-power battery operated devices you generally want to use a gateway due to the different nature of communications. Low-power devices need to send lightweight bursts of messages to save battery, compared to the much more verbose Azure IoT messages, so a conversion is needed.
This is true even for alternatives that could make a direct connection, such as Telstra NB-IoT — devices could connect directly to Azure using MQTT over TCP, but it would generally be better, in order to save battery life, for them to still connect via a gateway using something like LwM2M over UDP.
For a LoRaWAN deployment, the Dragino sensors are deployment ready, packaged with batteries and water resistant covers, with a wide variety of sensor types, and they can be customised as needed.
As well as sensor data, the solution should be extended to send control messages, such as changing data frequency, with an investigation whether the Dragino can send in batches (log every 20 mins, but send once per day). The documentation mentions the Dragino can also send based on interrupt trigger, e.g. immediately whenever the value crosses a threshold.
For a more robust solution, use IoT Hub instead of IoT Central, and have a fully automated set up of the Azure resources, allowing creation of separate integration, testing, and production environments.
IoT Hub will give you a lot more control over the system, including full Device Provisioning Services (DPS). You can even push LoRaWAN device provisioning information across from Azure IoT to TTN, so you can set the devices up in one place (Azure), and not have to set them up manually in TTN.
Product considerations
To take an IoT project from an investigation phase into a product phase, you need to consider the fully lifecycle architecture, such as by following the Microsoft Well-Architected Framework for IoT.
You need to ensure security is adequately addressed. LoRaWAN has encryption built in (the device keys), which provides a layer of protection over public LoRaWAN gateways (such as The Things Network), although you will need to trust the LoRaWAN network (and join) servers. For additional security you could run your own gateways and private network servers. The Dragino devices do not have built in tamper detection, if this is important for your scenario.
You will need to consider scalability and seviceability, and address questions such as who manages the gateways, how will you manage devices, and who will undertake in field installation and device management. These can become a large part of a project costs, especially as you scale to large numbers of devices.
To deploy commercially, you may want to use one of the paid cloud or enterprise tiers of The Things Stack, or another of the LoRaWAN network providers. Or do you want to handle these yourself — for some scenarios a private network may be a better option.
At scale you are likely to end up with a heterogenous network, with a hybrid mix of different technology, and your solution needs to be flexible enough to be extended in different directions as needed.

