
MQTT (originally Message Queuing Telemetry Transport) is an important protocol for IoT that has been widely adopted. Devices deployed to the field may be connecting to existing MQTT endpoints, however you may also want to deploy your own MQTT server for testing purposes.
This article shows you how to deploy an Eclipse Mosquitto MQTT server onto Azure, configured for secure connections (MQTTS, which is MQTT over TLS), accessible over the internet, and including support for both IPv6 and legacy IPv4.
First we will configure a network in Azure, then deploy the server, and then test the deployment.
The instructions below show the individual commands, but if you want a quick start then full scripts, with automatic parameters, are available on Github https://github.com/sgryphon/iot-demo-build/blob/main/azure-mosquitto/README-mosquitto.md
To deploy the network and then server components via the scripts:
az login
az account set --subscription <subscription id>
$VerbosePreference = 'Continue'
./azure-landing/infrastructure/deploy-network.ps1
./azure-mosquitto/infrastructure/deploy-mosquitto.ps1 YourSecretPassword
Read on for the full details.
Configure an IPv6 network in Azure
To set up the server you will first need to configure a network in Azure.
If deploying into an existing environment, you may already be following something like the Cloud Adoption Framework and have a network set up in your subscription landing zone, possibly with routes and firewalls, however many blueprints do not include IPv6 so you may need some additional setup.
Otherwise, to deploy separately into a test environment, you can use PowerShell along with the Azure CLI to create a network with a "de-militarised zone" (DMZ) subnet, and full IPv6 support, that will be configured to allow the incoming public access.
The commands below will create the needed Azure resources, with dual stack support for both IPv6 and IPv4.
First login and set the subscription (if needed) to deploy to:
az login
az account set --subscription <subscription id>
Preparing deployment variables
Set up variables for the environment and location. The following generates a consistent unique ULA (Unique Local Address) network, based on the hash of the subscription ID, i.e. it will be the same each time you run the script, but will be unique, allowing interconnection with any other future network without collision.
$VerbosePreference = 'Continue'
$ErrorActionPreference="Stop"
$Environment = 'Dev'
$Location = 'australiaeast'
$UlaGlobalId = (Get-FileHash -InputStream ([IO.MemoryStream]::new([Text.Encoding]::UTF8.GetBytes((az account show --query id --output tsv))))).Hash.Substring(0, 10),
$UlaDmzSubnetId = "0102"
Define the resource group name, virtual network name, subnet name, and network security group, following the Cloud Adoption Framework naming standards, and use the global ID to build the ULA global network prefix, and then the subnet prefix.
$rgName = "rg-network-$Environment-001".ToLowerInvariant()
$vnetName = "vnet-$Environment-$Location-001".ToLowerInvariant()
$dmzSnetName = "snet-dmz-$Environment-$Location-001".ToLowerInvariant()
$dmzNsgName = "nsg-dmz-$Environment-001".ToLowerInvariant()

$prefix = "fd$($UlaGlobalId.Substring(0, 2)):$($UlaGlobalId.Substring(2, 4)):$($UlaGlobalId.Substring(6))"
$globalAddress = [IPAddress]"$($prefix)::"
$dmzSubnetAddress = [IPAddress]"$($prefix):$UlaDmzSubnetId::"
$vnetIpPrefix = "$globalAddress/48"
$dmzSnetIpPrefix = "$dmzSubnetAddress/64"
Currently Azure only supports dual-stack networks, as NICs require a primary IPv4, so we need to also allocate and IPv4 network and subnet ranges to use. These use a 10.x.y.0/24 network where x is the first byte of the ULA Global ID, and y is the last byte of the subnet ID.
Note: as the IPv4 range is a lot more restricted, these are much more likely to clash if you have other existing networks and limit interconnectivity, but that won't affect basic testing.
$prefixByte = [int]"0x$($UlaGlobalId.Substring(0, 2))"
$vnetIPv4 = "10.$prefixByte.0.0/16"
$dmzSubnet = [int]"0x$UlaDmzSubnetId"
$dmzSnetIPv4 = "10.$prefixByte.$($dmzSubnet -bAnd 0xFF).0/24"
When deploying resources you should always tag them appropriately, e.g. following the Cloud Adoption Framework tagging conventions.
$TagDictionary = @{ DataClassification = 'Non-business'; Criticality = 'Low';
  BusinessUnit = 'IoT'; Env = $Environment }
$tags = $TagDictionary.Keys | ForEach-Object { $key = $_; "$key=$($TagDictionary[$key])" }
Deploy the network resources
Now that all the settings are ready, we can create the resource group:
az group create --name $rgName -l $Location --tags $tagsThen the network security group, along with some initial rules to allow ICMP, SSH (port 22) for access to the server, and both port 80 and 443 which will commonly be used by most servers, even if just to get a TLS certificate.
az network nsg create --name $dmzNsgName -g $rgName -l $Location --tags $tags

az network nsg rule create --name AllowSSH `
                           --nsg-name $dmzNsgName `
                           --priority 1000 `
                           --resource-group $rgName `
                           --access Allow `
                           --source-address-prefixes "*" `
                           --source-port-ranges "*" `
                           --direction Inbound `
                           --destination-port-ranges 22

az network nsg rule create --name AllowICMP `
                           --nsg-name $dmzNsgName `
                           --priority 1001 `
                           --resource-group $rgName `
                           --access Allow `
                           --source-address-prefixes "*" `
                           --direction Inbound `
                           --destination-port-ranges "*" `
                           --protocol Icmp

az network nsg rule create --name AllowHTTP `
                           --nsg-name $dmzNsgName `
                           --priority 1002 `
                           --resource-group $rgName `
                           --access Allow `
                           --source-address-prefixes "*" `
                           --source-port-ranges "*" `
                           --direction Inbound `
                           --destination-port-ranges 80 443
Finally, create the actual network, and then subnet.
az network vnet create --name $vnetName `
                       --resource-group $rgName `
                       --address-prefixes $vnetIpPrefix $vnetIPv4 `
                       --location $Location `
                       --tags $tags

az network vnet subnet create --name $dmzSnetName `
                              --address-prefix $dmzSnetIpPrefix $dmzSnetIPv4 `
                              --resource-group $rgName `
                              --vnet-name $vnetName `
                              --network-security-group $dmzNsgName
Once created, you can see the network in the Azure Portal, with the IPv6 address space.
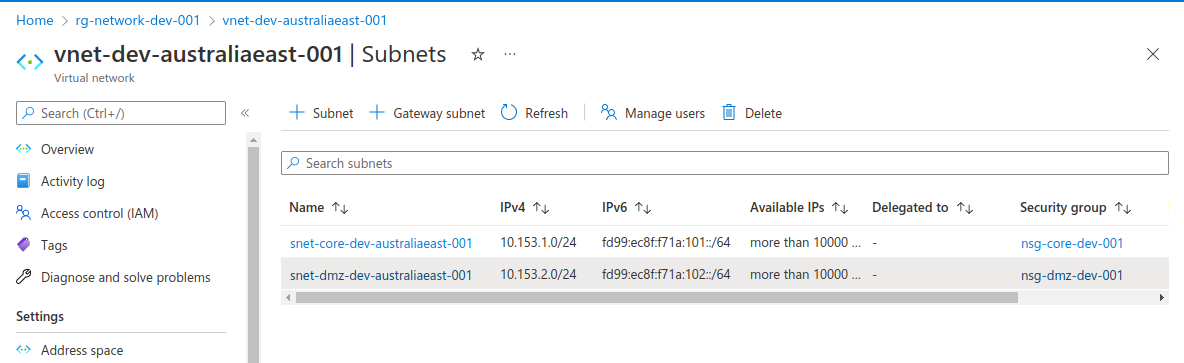
IPv6 support
Internet traffic is currently getting over 40% IPv6 on the Google statistics, which means it is important to ensure (and test) your solution supports IPv6. Within a few years IPv4 will be in the minority.
An increasing number of networks are moving to IPv6 single stack only, for example Telstra's consumer mobile network is now IPv6-only. Without the users even noticing! Want to check? If you are on Telstra mobile go somewhere like https://whatismyv6.com/.
The Telstra Wireless Application Development Guidelines section 7.5 requires that all new IOT/M2M devices and new end-to-end applications support IPv6 natively, and that all systems will be configured as either dual stack or single stack IPv6.
All large scale deployments are expected to be single stack IPv6, and IPv6 support is a requirement if you want your devices to be Telstra certified.
To access IPv4 only sites, tunnelling is provided (NAT64 or XLAT464), and for most applications this should not matter, but you still need to test for the increasing IPv6 only deployments that you don't have any hidden issues.
Deploying the Mosquitto server
When deploying a server in Azure, we can pass a cloud-init file as custom data, which will specify the files to create and programs to install on the server, such as Certbot for automatic TLS certificates and the Mosquitto MQTT broker, and any configuration needed, such as firewall setup.
Initial Cloud Init file
Create a cloud-init.txt file with the following contents. If running as a script one tricky bit is that we want the cloud init to configure the server using the generated host names and other deployment parameters, so the file below has a number of placeholders such as #INIT_HOST_NAMES# that we will replace with the relevant values before creating the server.
The installed programs include Certbot, for generating the TLS certificates, the Mosquitto server, and Mosquitto tools. There is a script to copy the certificates on update and make them available to Mosquitto, as well as the Mosquitto configuration and Mosquitto password files.
There are four test users configured: mqttuser, mqttservice, mqttdevice1, and mqttdevice2, which will have a chosen password, with the extra users having the suffix 2, 3, and 4.
The run commands, on initial server setup, configure the firewall (ufw) to allow the desired traffic, hash the Mosquitto passwords, configure Certbot, copy across the certificates, and then restart Mosquitto.
#cloud-config
apt:
  conf: |
    Acquire::Retries "60";
    DPkg::Lock::Timeout "60";
  sources:
    mosquitto-ppa:
      # 2.3 PPA shortcut
      source: "ppa:mosquitto-dev/mosquitto-ppa"
package_upgrade: true
packages:
  - certbot
  - mosquitto
  - mosquitto-clients
write_files:
  - path: /etc/letsencrypt/renewal-hooks/deploy/10-mosquitto-copy.sh
    content: |
      #!/bin/sh
      SOURCE_DIR=/etc/letsencrypt/live/mosquitto-mqtt-cert
      CERTIFICATE_DIR=/etc/mosquitto/certs
      echo "Renew ${RENEWED_LINEAGE}"
      if [ "${RENEWED_LINEAGE}" = "${SOURCE_DIR}" ]; then
        # Copy new certificate to Mosquitto directory
        cp ${RENEWED_LINEAGE}/fullchain.pem ${CERTIFICATE_DIR}/server.pem
        cp ${RENEWED_LINEAGE}/privkey.pem ${CERTIFICATE_DIR}/server.key

        # Set ownership to Mosquitto
        chown mosquitto: ${CERTIFICATE_DIR}/server.pem ${CERTIFICATE_DIR}/server.key

        # Ensure permissions are restrictive
        chmod 0600 ${CERTIFICATE_DIR}/server.pem ${CERTIFICATE_DIR}/server.key

        # Tell Mosquitto to reload certificates and configuration
        pkill -HUP -x mosquitto
      fi
  - path: /etc/mosquitto/conf.d/default.conf
    content: |
      allow_anonymous false
      password_file /etc/mosquitto/passwd

      listener 1883 localhost

      listener 8883
      certfile /etc/mosquitto/certs/server.pem
      keyfile /etc/mosquitto/certs/server.key
  - path: /etc/mosquitto/passwd
    content: |
      mqttuser:#INIT_PASSWORD_INPUT#
      mqttservice:#INIT_PASSWORD_INPUT#2
      mqttdevice1:#INIT_PASSWORD_INPUT#3
      mqttdevice2:#INIT_PASSWORD_INPUT#4
runcmd:
  - ufw allow ssh
  - ufw allow http
  - ufw allow https
  - ufw allow 8883
  - ufw allow 8083
  - ufw enable
  - systemctl stop mosquitto
  - mosquitto_passwd -U /etc/mosquitto/passwd
  - certbot certonly --standalone --preferred-challenges http --cert-name mosquitto-mqtt-cert -d #INIT_HOST_NAMES# -n --agree-tos -m #INIT_CERT_EMAIL#
  - RENEWED_LINEAGE=/etc/letsencrypt/live/mosquitto-mqtt-cert sh /etc/letsencrypt/renewal-hooks/deploy/10-mosquitto-copy.sh
  - systemctl start mosquitto
Preparing deployment variables
Similar to the network deployment, first set variables for the various configuration parameters.
Pick an appropriate value for the MQTT password.
The OrgId parameter is used to make global resource names, such as storage accounts and public DNS hosts unique. By default it is generated using the first four hex characters of your subscription ID, so you can easily run the commands as is in multiple personal developer subscriptions.
For a shared deployed you can alternatively use a more descriptive OrgId, such as purpleiot.
Note that for cost management the test server is set to shut down at 19:00 Brisbane time each day (09:00 UTC); you can change this to an appropriate value for your timezone, or provide an email for notifications.
$MqttPassword = 'YourSecretPassword'
$VerbosePreference = 'Continue'
$ErrorActionPreference="Stop"
$Environment = 'Dev'
$Location = 'australiaeast'
$OrgId = "0x$((az account show --query id --output tsv).Substring(0,4))"
$VmSize = 'Standard_B2s'
$AdminUsername = 'iotadmin'
$ServerNumber = 1
$ShutdownUtc = '0900'
$ShutdownEmail = ''
$AddPublicIpv4 = $true
Next generate the names of the new resources we will be creating, and the network resources we will be referencing (from the above), following the naming guidelines. The server name will be vmmosquitto001 and the unique DNS prefix mqtt001-<OrgId>-dev (with the full host name also based on the region).
$appName = 'mqtt'
$rgName = "rg-$appName-$Environment-001".ToLowerInvariant()

$networkRgName = "rg-network-$Environment-001".ToLowerInvariant()
$vnetName = "vnet-$Environment-$Location-001".ToLowerInvariant()
$dmzSnetName = "snet-dmz-$Environment-$Location-001".ToLowerInvariant()
$dmzNsgName = "nsg-dmz-$Environment-001".ToLowerInvariant()

$numericSuffix = $serverNumber.ToString("000")
$vmName = "vmmosquitto$numericSuffix"
$vmOsDisk = "osdiskvmmosquitto$numericSuffix"

$nicName = "nic-01-$vmName-$Environment-001".ToLowerInvariant()
$ipcName = "ipc-01-$vmName-$Environment-001".ToLowerInvariant()
$pipName = "pip-$vmName-$Environment-$Location-001".ToLowerInvariant()
$pipDnsName = "mqtt$numericSuffix-$OrgId-$Environment".ToLowerInvariant()
$pipv4Name = "pipv4-$vmName-$Environment-$Location-001".ToLowerInvariant()
$pipv4DnsName = "mqtt$numericSuffix-$OrgId-$Environment-ipv4".ToLowerInvariant()
$vmImage = 'UbuntuLTS'
Also create tags, similar to the network.
$TagDictionary = @{ WorkloadName = 'iot'; DataClassification = 'Non-business'; Criticality = 'Low';
  BusinessUnit = 'Dev'; ApplicationName = $appName; Env = $Environment }
$tags = $TagDictionary.Keys | ForEach-Object { $key = $_; "$key=$($TagDictionary[$key])" }
Updating the network security group
We also need to add a rule to the existing NSG to allow MQTTS traffic.
az network nsg rule create --name AllowMQTT `
                           --nsg-name $dmzNsgName `
                           --priority 2200 `
                           --resource-group $networkRgName `
                           --access Allow `
                           --source-address-prefixes "*" `
                           --source-port-ranges "*" `
                           --direction Inbound `
                           --destination-port-ranges 8883 8083
Deploying
To deploy the new resources, first we need to get the network and generate IP addresses for the server. These are based on the server number (to allow multiple MQTT servers), and assume the networks were generated as above, with ranges ending in /64 (and 0/24 for the IPv4 range). The statically allocated server address suffixes will be :1201, :1202, :1203, etc, based on the server number (and .21, etc for IPv4).
$dmzSnet = az network vnet subnet show --name $dmzSnetName -g $networkRgName --vnet-name $vnetName | ConvertFrom-Json

$privateIpSuffix = (0x1200 + $serverNumber).ToString("x")
$privateIPv4Suffix = 20 + $ServerNumber
$dmzUlaPrefix = $dmzSnet.addressPrefixes | Where-Object { $_.StartsWith('fd') } | Select-Object -First 1
$vmIpAddress = "$($dmzUlaPrefix.Substring(0, $dmzUlaPrefix.Length - 3))$privateIpSuffix"
$dmzIPv4Prefix = $dmzSnet.addressPrefixes | Where-Object { $_.StartsWith('10.') } | Select-Object -First 1
$vmIPv4 = "$($dmzIPv4Prefix.Substring(0, $dmzIPv4Prefix.Length - 4))$privateIPv4Suffix"
Next create a resource group for the server, the public IP (v6) address, the network interface card (which must have the initial internal IPv4 address), then add the public address configuration (with both private and public IPv6) to the NIC. Finally create a public IPv4 address (for clients that don't support IPv6) and update the default config.
The commands also collect the generated host names, which will have the unique prefix (set above), region, and other details, which will be passed to Certbot to create the TLS certificate.
az group create --name $rgName -l $Location --tags $tags

az network public-ip create `
  --name $pipName  `
  --dns-name $pipDnsName `
  --resource-group $rgName `
  --location $Location `
  --sku Standard  `
  --allocation-method static  `
  --version IPv6 `
  --tags $tags

az network nic create `
  --name $nicName `
  --resource-group $rgName `
  --subnet $dmzSnet.Id `
  --private-ip-address $vmIPv4 `
  --tags $tags

az network nic ip-config create `
  --name $ipcName `
  --nic-name $nicName  `
  --resource-group $rgName `
  --subnet $dmzSnet.Id `
  --private-ip-address $vmIpAddress `
  --private-ip-address-version IPv6 `
  --public-ip-address $pipName

$hostNames = $(az network public-ip show --name $pipName --resource-group $rgName --query dnsSettings.fqdn --output tsv)
$certEmail = "postmaster@$hostNames" # Using the main host name

az network public-ip create `
  --name $pipv4Name  `
  --dns-name $pipv4DnsName `
  --resource-group $rgName `
  --location $Location  `
  --sku Standard  `
  --allocation-method static  `
  --version IPv4 `
  --tags $tags

az network nic ip-config update `
  --name 'ipconfig1' `
  --nic-name $nicName `
  -g $rgName `
  --public-ip-address $pipv4Name

$hostNames = "$hostNames,$(az network public-ip show --name $pipv4Name --resource-group $rgName --query dnsSettings.fqdn --output tsv)"
Updating the Cloud Init file
Once we have the host names, we can insert them into the template Cloud Init file, along with the other parameters, by replacing the tokens, and then storing in a temporary cloud-init.txt~ file.
(Get-Content -Path (Join-Path $PSScriptRoot cloud-init.txt) -Raw) `
  -replace '#INIT_HOST_NAMES#',$hostNames `
  -replace '#INIT_CERT_EMAIL#',$certEmail `
  -replace '#INIT_PASSWORD_INPUT#',$MqttPassword `
  | Set-Content -Path (Join-Path $PSScriptRoot cloud-init.txt~)
Deploying the server
We are now ready to create the actual server, using the updated Cloud Init file, and configure the auto shutdown.
Note that --generate-ssh-keys will configure the SSH certificate for the current user. You can also use az vm user update to add SSH access for additional users.
az vm create `
    --resource-group $rgName `
    --name $vmName `
    --size $VmSize `
    --image $vmImage `
    --os-disk-name $vmOsDisk `
    --admin-username $AdminUsername `
    --generate-ssh-keys `
    --nics $nicName `
    --public-ip-sku Standard `
    --custom-data cloud-init.txt~ `
    --tags $tags

if ($ShutdownUtc) {
  if ($ShutdownEmail) {
    az vm auto-shutdown -g $rgName -n $vmName --time $ShutdownUtc --email $ShutdownEmail
  } else {
    az vm auto-shutdown -g $rgName -n $vmName --time $ShutdownUtc
  }
}
Once the server is created, you can see it in the Azure Portal, with the allocated IPv6 addresses and other details:
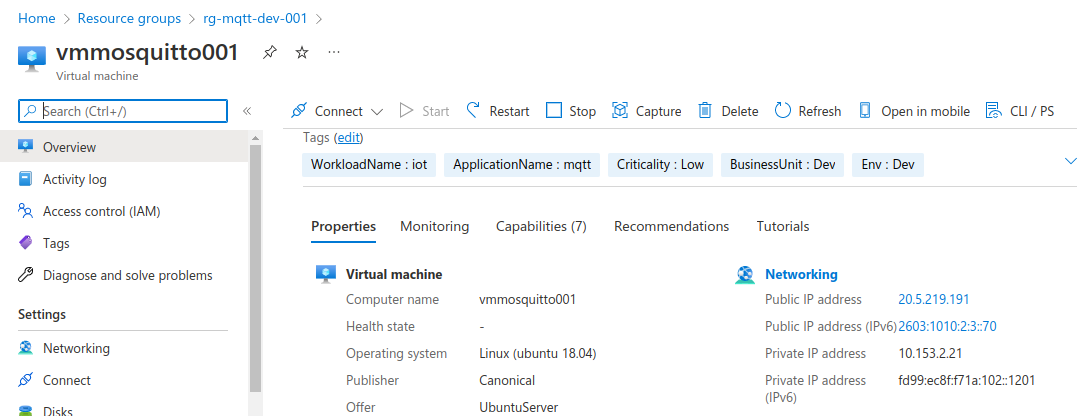
Testing the deployment
After the creation process, you can output the details of the server, including the host names and public IP addresses:
$vm = (az vm show --name $vmName -g $rgName -d) | ConvertFrom-Json
$vm | Format-List name, fqdns, publicIps, privateIps, location, hardwareProfile
This will output something like:

To test you will need to have some MQTT tools installed, such as the Mosquitto client tools. Then you can test the server, first subscribe in one terminal:
$mqttPassword = 'YourSecretPassword'
mosquitto_sub -h mqtt001-0xacc5-dev.australiaeast.cloudapp.azure.com  -t '#' -F '%I %t [%l] %p' -v -p 8883 -u mqttuser -P $mqttPassword
Then use another terminal to publish a message (note that mqttdevice1 has the password suffix '3'):
$mqttDevice1Password = 'YourSecretPassword3'
mosquitto_pub -h mqtt001-0xacc5-dev.australiaeast.cloudapp.azure.com -t test -m '[{"n":"urn:dev:ow:10e2073a01080063","u":"Cel","v":23.1}]' -p 8883 -u mqttdevice1 -P $mqttDevice1Password
The successful message will be displayed in the subscribed client (and in the server logs):

SSH access
You can also SSH into the server, to check the application (the script automatically assigns your local SSH key with access):
ssh iotadmin@mqtt001-0xacc5-dev.australiaeast.cloudapp.azure.comYou can then follow the Mosquitto logs, as shown in the screen above, with:
sudo tail -f /var/log/mosquitto/mosquitto.logNext steps
Once you have a secure MQTT test server set up on the Internet, you can use it to test and validate devices. We will look to cover the device side in a future article.
Consider the Telstra Wireless Application Development Guidelines, particularly the considerations around IPv6 and security; and if you are looking to get devices Telstra Certified then these features are required: https://www.telstra.com.au/business-enterprise/products/internet-of-things/capabilities
In some cases existing devices may not support IPv6 -- the deployed MQTT server is dual stack, so you can use the alternate host name to access it via IPv4.
You may also have existing devices that don't support MQTTS / TLS security. In these cases you would need to set up a private APN (Access Point Name) and private network to your service endpoint, to ensure that credentials are kept secure. For testing purposes you could set up an insecure MQTT test server, on a temporary or limited basis.
Note that while MQTT is a standardised protocol it does not define any semantics of the messages being transported. This means that simply supporting MQTT does not mean that two services can communicate. What is sent over MQTT ranges from the complex usernames and long topics of Azure IoT hub, sending verbose JSON messages through to short topics like s/us and compact comma separated values used by Cumulocity.
This means that even once you have two systems connected via MQTT there may still be custom work needed to translate the payloads.